ACDSEE Pro Mac 3 - Why would you bother?

I recently installed the 30 day trial of this software to try to help a friend out who was struggling with it. After the usual click forty thousand times to install routine, the product said it installed properly.  Like most programs that start out on the Windoze platform it wants to be the default application for everything, a very customer hostile move.  I declined since it was a) a trial and b) I am very happy with the tools I use that work properly.

I launched the application and navigated to a folder where photos are stored in their original form.  It looked like I would need to Import images (hate this), but when I clicked the Image button that was not an option.  Why show me a button I cannot use?

Not one single image could be opened in either View or Develop mode.  The application claimed that they were all locked or in a format that the application could not read.  And even though I cleared the checkbox to have ACDSEE Pro be the default for all images, it still set itself as such.  F*CKING PIECE OF CRAP.

I checked the help and it said this error could occur with RAW files if they were already open with another application.  Nope.  Wouldn't open JPEGs either.  Hell it wouldn't open file types it arbitrarily decided it should be the master of.  Otherwise Help was helpless.  I opened a ticket with support and the first email invited me to update my ticket.

Fired up Appzapper and completely removed this junk from my Mac.  To help my friend, I will tell him to get rid of this program and use a processing application that is a) Mac intelligent and b) not crap.

So if you are thinking about trying less expensive processing applications on your Mac, run do not walk past ACDSEE Pro 3.  I understand that the Windows version is very good.  I don't run Windows.  The Mac version is lousy.  Don't waste your time or money.

onOne Software Announces Perfect Photo Suite 8

From my friends at OnOne Software onOne Software Announces Perfect Photo Suite 8 New Perfect Enhance module, Perfect Eraser, Perfect Batch utility, and re-engineered Perfect Effects module create a complete photo editing solution that seamlessly integrates into any workflow

Portland, OR – September 4, 2013 – onOne Software, Inc., a leading developer of innovative and timesaving solutions for digital photography, today announced Perfect Photo Suite 8—the photographer’s choice for photo editing. Perfect Photo Suite 8 is a full-featured, standalone photo editor that integrates seamlessly with Adobe® Photoshop®, Lightroom®, Photoshop Elements, and Apple® Aperture® and it includes all the best tools a photographer needs to create extraordinary images. Key new features include the Perfect Enhance module for essential photo adjustments, the Perfect Eraser with content-aware fill technology, the Perfect Batch processing utility for applying workflows to multiple images at once, and a re-engineered Perfect Effects module with twice as many filters, customizable presets, and integrated FocalPoint™ technology.

The new tools and capabilities alongside Perfect Photo Suite 8’s eight modules—Effects, Enhance, B&W, Portrait, Mask, Layers, Resize, and Browse—allow photographers to enhance, retouch, and stylize images in a layered workflow, replace backgrounds, create high-quality enlargements, prepare images for output, and batch process workflows. The modules share a unified interface, each targeting a specific imageprocessing task. Each module provides only the tools necessary to complete the job at hand, eliminating screen clutter and confusion for the user.

“We listened intently to the digital photography community about what they wanted for their image processing in today’s world of plug-ins, online apps, and subscriptions,” said Craig Keudell, president of onOne Software. “We made it a priority to respond quickly and design a cohesive new product that continues to focus on photography and is built for photographers of all levels, from enthusiasts to professionals. We’ve leveraged our extensive experience as a plug-in company and evolved the Perfect Photo Suite into a complete and powerful photo editor that, unlike existing plug-in collections, works as one, elegantly designed product that seamlessly integrates into any workflow.”

New in Perfect Photo Suite 8: • Perfect Enhance module – Perfect Enhance provides essential tools for basic enhancements. Use it to adjust brightness and contrast, remove a color cast, remove dust spots and power lines, and add sharpening and vignettes. It is an ideal module to start with when using Perfect Photo Suite 8 as a standalone application or when quick corrections are needed. • Perfect Eraser – Using content-aware fill technology and simple brush strokes, the Perfect Eraser removes objects and automatically reconstructs the image with realistic results. • Twice as Many Filters – The Effects module now includes new adjustable filters including: HDR Look, Dynamic Contrast for tonal clarity, Vintage, Grunge, Antique, and more. • Customizable Presets – All built-in presets included in Perfect Photo Suite 8 may be deconstructed by their filter settings and personally customized. • FocalPoint is now in the Effects Module – The best parts of FocalPoint technology to create bokeh, tilt-shift, and selective focus effects after the shot, are now in the Effects module as the Lens Blur filter. • New Browse module – Images can be browsed and directly accessed from Perfect Photo Suite wherever they are stored—on the computer, an external drive, a connected network, and even on a cloud-based storage service like Dropbox, Google Drive, or Apple’s photo stream. • Perfect Batch Utility – Powerful batch processing of actions from one or multiple modules, including the insertion of a watermark. • Multiple File Handling: As a photo editor, you can now open and work with more than one image at a time. Move between images to edit or copy layers from one file to the next. • Improved Masking Bug: Redesigned Masking Bug in the Effects and Layers modules make mask creation easier and more intuitive. • Higher Quality Effects: Performance enhancements improve effects by minimizing artifacts without sacrificing processing speed. • Improved RAW file handling: Open and process RAW files faster and with better quality. Support for new cameras also added. onOne Software Announces Perfect Photo Suite 8, a complete photo editor for every workflow

Availability and Pricing The new Perfect Photo Suite 8 will be available November 26, 2013. Pre-orders are available immediately at www.ononesoftware.com/store. Perfect Photo Suite 8 is available in three editions: Premium, Standard, and an edition for Adobe Lightroom & Apple Aperture. The Premium Edition works with Adobe Photoshop, Lightroom, Aperture, Photoshop Elements, and as a standalone application. Owners of previous versions of Perfect Photo Suite Premium Edition can upgrade for $99.95. New users may pre-order the Premium Edition for $179.95. For a limited time, pre-orders of Perfect Photo Suite 8 Premium Edition will include a complimentary Essential Video Guide to Perfect Photo Suite 8, which provides a comprehensive collection of getting started training videos for Perfect Photo Suite 8 ($40 value).

Perfect Photo Suite 8 for Adobe Lightroom & Apple Aperture works with Lightroom, Aperture, Photoshop Elements, and as a standalone application. It is available for $129.95 | $79.95 upgrade. The Standard Edition works as a complete standalone photo editor and is available for $79.95. New users who pre-order Perfect Photo Suite 8 will immediately receive a complimentary license for Perfect Photo Suite 7.5. Customers who pre-order Perfect Photo Suite 8 will receive all upcoming Loyalty Rewards that will be delivered monthly to owners of the Perfect Photo Suite 8. For those who have purchased Perfect Photo Suite 7.5 on or after August 1, 2013, onOne Software will issue a complimentary upgrade to Perfect Photo Suite 8 via download when it is available. For more information on Perfect Photo Suite 8, please visit http://www.ononesoftware.com.

About onOne Software onOne Software, Inc., is a leading developer of innovative software tools and apps for digital photography and offers time-saving software solutions for photographers of all levels, from enthusiasts to professionals. Leveraging its extensive history as successful plug-in developer for Adobe Photoshop, Photoshop Elements, Photoshop Lightroom, and Apple Aperture, and continued development of cutting-edge technology, onOne publishes unified solutions that offer both full-featured photo editing capabilities and the flexibility of traditional plug-ins. Founded in 2005, onOne Software is a privately held company located in Portland, Oregon. For additional information, visit www.ononesoftware.com.

Press Contact: Amy Chan, onOne Software, achan@ononesoftware.com, 503-968-1468 x 137 General Press Inquiries: press@ononesoftware.com onOne Software Announces Perfect Photo Suite 8, a complete photo editor for every workflow

Online Press Center: www.ononesoftware.com/press onOne Software Blog: www.ononesoftware.com/blog Facebook: www.facebook.com/onOneSoftware Twitter: www.twitter.com/onOneSoftware Google+: www.ononesoftware.com/plus ©2013 onOne Software, Inc. All rights reserved. onOne Software, the onOne Software logo, and Focused on Photography are registered trademarks and Perfect Photo, Perfect Enhance, Perfect Effects, Perfect Eraser, Perfect Batch, and FocalPoint are trademarks in the United States and are the property of onOne Software. Adobe, Photoshop and Lightroom are registered trademarks of Adobe Systems, Inc. Apple and Aperture are registered trademarks of Apple Computer, Inc. All other trademarks are property of their respective owners.

Why Adobe Creative Cloud is a bad idea for photographers

Yesterday at Adobe MAX, Adobe talked about the future of the Creative Suite, or more accurately the no-future of the Creative Suite. As I predicted, this is the last version of the Creative Suite. From here forward, if you want current Adobe software you will only have a single option, that of subscribing to the Creative Cloud. I like Adobe products, but there is nothing in the Creative Cloud that is sufficiently compelling to photographers. In fact, Adobe put so much spin on the "value proposition" that it could torque the top off the Burj Khalifa. Why would Adobe do this?

Benefits to Adobe

  • Single code base, centrally reposited
  • Annuity revenue stream
  • Prevents software piracy on new versions
  • Ability to release new features on availability
  • It's a subscription. No subscription, software stops working
  • Cloud connections allow siphoning of user usage data
  • No public patch library to maintain

Bad for You

  • No local install to use when you want to if subscription expires
  • Pay forever model
  • Over the shoulder data gathering
  • No ability to run older versions

Alleged Benefits to You

  • New features available sooner without waiting for a version update
  • Payable over time, no single large charge
  • No need to buy software assurance
  • Create new workflows across multiple devices

Adobe is a business. They will make decisions that will do at least one of three things, preferably all three.  Not that your happiness is not in this list.

  • Increase Profit
  • Decrease Cost
  • Reduce Risk

When they make these decisions, you and I as customers come way down on the priority list. This is completely normal. Companies say customer first but it's not true. It's always company first spun in a manner to smell like the customer is winning. Sometimes, the customer even does win. The alleged benefits of the Creative Cloud are dubious on their best day. The lie about new features being available faster is a complete pantload. Service packs and updates have been the norm forever and new code and new services have been delivered this way since day one. The Adobe statement is a burning bag of s**t. The illusion that you will save money is another load of poo. You only save money if you have a clear end date when you will no longer use the software and this end date is prior to when you would have paid the traditional license model off. Adobe is SMART. They understand that once they've hooked you, getting off the hook will be hard. What benefit has software assurance ever really delivered to anyone? In a demand marketplace, new versions appear regularly, they are always upgrades and the software assurance will have magically expired or the change will make the assurance not qualify. Microsoft has smoked customers with this line of crap for years. IBM does this today. It's not new, it's an old well proven lie. As a user I may be able to create new workflows across multiple devices but to do so, I will be binding my workflow and devices to Adobe. You're free to work any way you want so long as it's Adobe's way.

The sad reality is that there is nothing really in here for the photographer.  The ability to use Adobe Revel?  Big whoop.  The ability at some point in the future to maybe do culling on your iPad and have that sync to your Lightroom library?  That would be nice, but why would that be tied to Creative Cloud?  If they really wanted to make a clean workflow, there's no reason to force everything into Creative Cloud.

So Why Are They Doing This

In software and as a corporate software developer, you want to get a customer and keep the customer FOREVER.  You want to make it as difficult as possible for customers to use your tools and then leave you for another vendor.  Proprietary file formats, locked file structures, patented screens, patented workflow sequences are all tactics that every major software company has tried.  The plain and simple goal is what the software industry knows to be VENDOR LOCK-IN.  Their goal is to lock you up into their infrastructure so tightly that if you leave, you get to start over at ground zero.  It's not just Adobe.  Oracle and IBM and even Apple have been pulling this kind of scam for a long time.  The difference with Creative Cloud is that you only have ONE licensing option, that being subscription.  Subscription can work.  But only if it is priced correctly.  $20 per month on a minimum one year term for Photoshop may be ok, but I think that the price is high.  $50 per month on a one year minimum for the entire Creative Suite means that after 10 months, I would have paid the upgrade to an entire new version.  Will I get an entire new version in 10 months?  NFI.  And unlike the current licensing model, if I have no need to upgrade, and just want to use the software that I know and love, there's no option.  If I stop paying, the software stops working.  It's about as customer hostile as you can get.

So why would a smart company do this?  Cash money would be one reason.  The ability to lock a customer in for a long time is another.  Building a predictable annuity revenue stream is another.  Note that keeping customers happy is not in scope.

I've been watching the trade journals and at DP Review, Techcrunch, and numerous others, I have not found any kind of proportion of note that likes the plan.  Over 90% think it sucks.  Some do like it.  Some of them also believe that it's for our own good, whatever the f**k that means.  I don't agree.  I think that the Creative Cloud program is nothing but a complete and utter cash and marketspace grab.  So I choose not to play.  I would reconsider if the pricing were reasonable.  People would not pay $2 for a song online but at $0.99 it was a landslide for the record industry.  The movie industry still wants to charge more for a digital movie of lower quality than a physical movie of higher quality.  This is both stupid and exactly what I would expect of those troglodytes.  Adobe needs to fix it's recto-cranial inversion and if they are so frakking committed to Creative Cloud, price it so participation ceases to be a question.

What About Lightroom?

It's been said that Lightroom will not be part of the Creative Cloud. So far. If Lightroom 5 is available as a standalone purchaseable license, I will upgrade. If only available in the Creative Cloud, I'll be getting off. I won't be signing up for Creative Cloud. As a CS6 Master Collection licensee, I could spend years and still not get leverage of all the incredible capability in the software I already have. Moreover, there are LOTS of alternatives in the marketplace for the things that I need to do. Yes, Adobe products do many of them extremely well, but I'm not willing to live by Adobe's draconian model to use their newest offerings. Capture One, Aperture, hell even iPhoto could be ok. Nik (until Google kills it), OnOne, DxO, Tiffen all make great point editing solutions, often available at terrific pricing and NONE OF THEM STOP WORKING IF A SUBSCRIPTION EXPIRES.

You might love Creative Cloud.  If you do, good for you, save time and effort commenting on how wrong I am.  Instead go use your software until they change the terms and conditions without prior notice and feel an enormous pain in your rear end.

Three Tools Photo Editors MUST HAVE

I'm often asked by students and club members what they might need to be successful photographic editors in the digital darkroom. I will take as a given, a decent camera, editing software that fits the person's needs and some training on the software.  You don't get very far without those at least.

But once photography becomes more than a spectator sport, you will need three key elements to help you maximize your returns.

1.  Display Calibration

If your computer display is not set correctly, and if it's not calibrated, it's not set correctly, you won't get what you really expect from your editing.  Moreover images exported for the web and especially those that are printed are not going to match what you saw in your editor.  There are lots of calibrator options out there.  I have bought over the years, the Huey Pro, the Spyder Elite and the Color Munki Pro.  Save time and money.  If you only need a display calibrator buy the Color Munki Smile.  It's all you'll need and does a great job.  I DO NOT recommend either the Huey or the Spyder.  It's your money, spend as you wish but the Color Munki is far and away the best system in my book.  Buy it on Amazon and help support The Photo Video Guy

2.  Tablet

There are a variety of pen enabled tablets in the marketplace.  For any kind of semi-serious to serious editing, there is only one.  The Wacom Intuos 5.  There are multiple sizes, I find the Small to be extremely convenient. There is a minor learning curve to working with a tablet, but once you do, you'll wonder how you ever did any kind of real editing with a touchpad or a mouse. Buy it on Amazon and help support The Photo Video Guy

3. Grey Card

Putting a grey card in the first shot of a sequence will make your white balance and exposure management much simpler. You can certainly get more sophisticated tools such as the ColorChecker Passport that I like very much and use myself, or the dedicated Lastolite popup grey card (and white card for video) but even a basic grey card works well. Put it in your bag and USE it and you'll be surprised at how much better your images are when you edit them. Buy the Passport or Lastolite on Amazon and help support The Photo Video Guy.

OPINION : Non-linear Video Editing

I never learned iMovie or Elements or any of the simple to use video editors.  I learned on Final Cut Studio, a monster application with incredible power and a definite learning curve.  I got to a level of not completely dangerous competence.  Then Apple released Final Cut Pro X.  Apparently iMovie users loved it.  I found the transition somewhat difficult and certainly real Professionals had issues with FCP X.  Apple has enhanced the product since release and added in many of the missings that were in Studio and not in X. FCP X works fine and is definitely priced competitively and the Motion application at $50 is a stunning buy.  Regardless, I was regularly frustrated by two things.  If I shot anything on a Canon digital camcorder it had to use this dumb transcode thing just to get the media into a project and then when I was finished, compressing and exporting video was a pain in the butt, many of the direct uploads did not work properly and the encode took a LONG time.

So I was looking around www.lynda.com one day and saw a class by video guru Rich Harrington on moving to Adobe Premiere Pro for Final Cut users.  Mr. Harrington has forgotten more about video editing than I will likely ever know but his teaching style is easy to follow and I worked through the training and was very impressed.  To me, it looked like Premiere Pro had the same kind of structure as Final Cut Pro Studio from an editing perspective.

Since I owned the Master Edition of the Creative Suite (for other reasons) I already had Premiere Pro so I thought I would give it a shot.  It has a learning curve, like any serious product but having the background of sorts in older non-linear editors it wasn't all that hard.  I also took the Lynda class on Premiere Pro with Abby Shapiro, the instructor I had learned Final Cut Studio from.

Usability is incredible and I'm sure I have not even scratched the surface of the product.  What I know is that editing video and audio is straight-forward for me and performing corrections and adding effects is dead simple.  Adding credit rolls and title sequences and lower thirds is very simple.  As with FCP X there are a number of templates included and veritable slew of external offerings available on the web.

What really sets Premiere Pro ahead for me is how it leverages my hardware for high performance.  FCP X could use my Matrox Mini video coprocessor, some of the time, but it didn't seem to add much in the way of performance.  Premiere Pro sees the Matrox automatically and easily leverages the Matrox assisted compression algorithms.  This was like pulling teeth in FCP X.  There was also no real consumption of the GPU in the Mac Pro that I could see.  I recently changed out the ATI 5870 in the the Mac Pro for an nVidia GTX 680 (it works fine with 10.8.x but no boot screen) and I changed a couple of text files in the config and now Adobe's Mercury engine fully leverages that stack of Cuda cores in the GPU.

I also found that the Import in Premiere Pro was instant.  No transcoding or modifications required.  Massive time saver.  Once the editing is done, I select Export, pick the compression type and hit Queue.  The export job goes directly into Adobe Media Encoder and it really screams along.  This is so much more reliable and so much faster than the FCP X or Compressor alternatives that to a working pro, the time savings would pay the price difference in no time at all.

I am not a professional video editor.  Premiere Pro rocks it for me.  I am told that the current release of Premiere Elements is also very quick and very easy, an improvement over prior versions.  I have no personal experience with it but if as rumour has it, Elements contains a lot of the functionality of the Pro release, it might do the job for you.  I'm going to stick with Premiere Pro.

Now to learn enough After Effects so what I make doesn't suck enormously.

Tips to Make Better Images : Calibrate Your Monitor

CMUNSML_M1.jpg

As digital photographers, we have the luxury of having complete control of the digital darkroom.  We have not always had this, but with great power comes great responsibility.  (with apologies to Stan Lee and John Romita Jr.) Your responsibility?  Make sure that BEFORE you start working in the digital darkroom, make sure your tools are not lying to you.

Here's a secret.  Unless the magical unicorns of editing sit on your shoulder, your monitor is wrong.  If you are still using a CRT, don't spend money on a calibrator, go buy a decent IPS display and come back after you've done that.

IPS or In Plane Switching displays are a great place to start with for a display.  But maybe you have a general LCD, or LED powered LCD or a laptop display.  Then by default you are seeing issues.  Most all monitors these days have the ability to change their brightness automatically.  Good for word processing and browsing, bad for editing.  Most all monitors come set from the factory to eyeball stunning brightness, crushed gamma and high contrast.  Why?  So they look "better" on the wall in the retail store.  It's just like a TV.  If you bought your TV at a big box store, it was on display in "demo" or "vivid" or "retina burn" mode.  You get it home, turn it on and it hurts.  If you play games on your computer, many games "reconfigure" your display for brightness and contrast, or to make the dark scenery legible so the monster doesn't eat your face, you turn the display way up.

Enough kvetching on my part.  A display calibrator reads the display, measures the display capabilities and produces a display profile called a display ICC.  These are just like a printer / paper ICC file but for your display.  There are lots of vendors out there doing this with the best known being the Datacolor Spyder, the Huey and the X-Rite Colormunki.

CMUNSML_M1I have owned all three.  The Huey was incredibly inconsistent.  Software updates were rare and doing multiple monitors cost extra.  Bad - do not buy.  Until the release of the Spyder 4 Elite (and only that model), the calibrations were never consistent and Datacolor's software is still serialized to a single computer.  Bad choice - do not buy.  The Colormunki line consisting of the Photo, the iDisplay, the Display and now the Smile are easy to use, have great software, are fast and consistent.  The Smile is new and sells for about $120.  If you don't need to profile printers or paper or projectors, buy the Smile, keep the rest of your money in your pocket and get to the calibrating.

I've spoken about calibration on the TV show and at meetings of the Newmarket Camera Club.  A very seasoned member, who has developed a healthy cynicism about tech sent me this email the afternoon after he bought a Smile.

"Ross,

I did the calibrations on my three monitors......quite a difference..
I also took it to work and let the Publication Dept do their monitors.
They now know why the publications look bad.
All of their monitors were way off.
I'd recommed this to anyone who wants to look at real colour on their montors."
The deal was that if he did not see a difference in his displays after calibration, he would return the device, no questions asked.  He's not returning the Colormunki Smile, and I expect the production department at his place of work will be buying their own as well.
Calibration isn't perfect and you should be recalibrating your displays regularly.  I do mine every two weeks.  Since the process takes all of five minutes, it's no problem at all.  If you aren't happy with your edited work not looking the same on paper or on the web, or you do all kinds of editing work on your machine and it then looks like cat yak on a different machine, your monitor is in need of caibration.  Save time, save headaches, save frustration, get a display calibrator and if you want it good, fast and inexpensive go directly to the Colormunki system.

Tips to Make Better Images - HDR 101 by Guest Writer Darren Gahan

The guest writer for this article is Darren Gahan.  Darren is a professional real estate photographer in addition to being a superb Lightroom and Photoshop Elements educator.  I've had the pleasure to teach with Darren in the field and be a guest on the Daytripper Webtalk show with Darren and his co-hosts Bryan Weiss and Gabriel Bousquet. ----------------------------------------------------------------------------------

HDR 101 with Darren Gahan

What is HDR? High Dynamic Range. What is Dynamic Range? Contrast, as in dark areas and bright areas.

Why would I be interested? Our eyes see a much larger range of light and dark detail than the camera can capture. We use HDR Photography to make the photo the way our eyes would see it. HDR Photography can also be used to enhance or modify a regular looking photo into an exaggerated brightness and or colour photo.

Do I need special equipment? No, you can use any camera as long as there is a way to make the images brighter and darker. Most cameras have a feature called "Exposure Bracketing" that will change the brightness automatically after every shot.

Do I need a tripod? No, but it would help and make things easier.

Can I do a HDR of moving subjects? Not really. Because it has to overlay each image exactly on top of each other, things that move will create a problem called "ghosting" .

How would I set my camera to do this? Set your camera to the Aperture Priority Mode. A or Av (If it doesn't have this mode, use the P or other advanced mode where it will allow you to use Exposure Bracketing. Find the Exposure bracketing feature of your camera and turn it on. It may be helpful to also turn on your continuous shutter release or burst mode.  Try to hold the camera steady and not move it while it is recording the photos. Take a deep breath, hold it for a second, then when you start to slowly let it out, press and hold the shutter button down and the camera will take the required number of photos then stop, and then you release the shutter button. This is where a tripod is very useful.

What if there is a range of exposure values in bracketing? Usually a difference of 1ev (also called 1 stop) is enough. Feel free to experiment.

How can I tell if it worked? Play back the photos. If it worked, there should be 3 photos of the same subject with 3 different brightness levels.

TIP: You are looking for a normal or middle brightness photo, and 1 darker than normal and 1 brighter than normal. Your camera may have them in a different order, but usually in this order: Normal -> Darker -> Brighter, but this doesn't matter.

What if I have 2 dark photos and 1 normal brightness photo? This means you need to find and use your exposure compensation control, and set it to a value of +1 (plus 1 ev).

What if I have 2 light photos and 1 normal brightness photo? This means you need to find and use your exposure compensation control, and set it to a value of -1 (minus 1 ev).

Does it matter if I shoot in JPG or RAW? No it doesn't make any significant difference. In fact, if you aren't comfortable with shooting in RAW or you don't know what it is, don't worry. Some software may only work with JPG images or with RAW images converted to a different format, such as Photoshop Elements. (Which does have a RAW converter)

What software do I need to process my photos? There are many different software packages out there, each with a specific advantage. The best bang for your buck would be Adobe Photoshop Elements. Available at Henry's for around $99. (Henry's also has workshops on Photoshop Elements. I teach at many of GTA locations. I also offer my services directly and can do customized training in Elements, CS5 & CS6, Lightroom or Apature) You can also download a FREE 30 day trial fully functional of Photoshop Elements from the Adobe website.

In Photoshop Elements (Version 9 and above) open up your 3 (or more) photos from your bracketed set. (If they are in the RAW format, make sure you select all 3 at the same time before you choose Open,<Click the first one, hold CTRL <<CMD on a MAC>> and click on the other 2, release the CTRL key> and then in the Camera RAW editor, select all 3 images <<The same way>> and then choose Open Images on the bottom right. ) Go to File -> New -> Photomerge Exposure. Play with the 3 sliders till you are happy. File Save As a jpg file and you can have it printed or shown anywhere.

Tips to Make Better Images : Post Processing is Incredibly Valuable

For many of us, the digital darkroom remains an intimidating place.  There are so many tools, and so much power and so much apparent complexity, that many image makers are content with the JPEG that the camera spits out.

Nothing wrong with that.  You paid good money for your camera and its designed to make the experience simple and positive for you.  In fact so many people are into photography these days there are literally hundreds of simple post processing apps to get to good enough very fast.

The full story is that the digital darkroom brings us more capability, more simply and with less toxicity than the chemical darkroom ever did.  And if you are concerned about wrecking your images, heres what to do.

Instead of importing, ingesting or whatever term your software uses to get the images into itself,directly from the card, copy them from the card to a hard disk first.  These are your master originals and you wont work on them at all.  Once done, now do the import process into your editor of choice.  Some editors have catalogues like Lightroom and iPhoto.  Others dont, they work directly on the file itself such as Bridge to Photoshop.  I prefer proper catalogues, but they are your images, do whatever you want, just only work on copies of the originals.

Editing can be destructive, such as when working on the Background layer in Photoshop, or non-destructive, such as anything you do in Lightroom.  Because you are never working on your master original, this doesnt matter.

In any case, nothing you do in these editing tools is permanent until you commit the change, and even then our good friend Mr. Undo can get us out of all kinds of trouble.  He has two aliases Ctrl-Z on the PC and Cmd-Z on the Mac.  He is your friend.

You can take public courses, online courses, watch Youtube videos for the rest of your life or even hire <insert plug for self here> a private coach.  Whatever works for you.  But, and this is critical, remember that the source may have a different desired outcome than you do.  If the source is a paid professional photographer, experimentation is not on their radar.  They are about speed and throughput.  If you are a happy amateur, and even if you sell some work, you just may not be in that big a hurry.  Take your time.

Now once in the editor be aggressive.  Push the sliders to their stops and watch what happens.  A lot of the time things will look like crap, but only by pushing the envelope of each slider do you start to see what the slider can do.  Once you are comfortable with one slider, make notes on what it does.  Your memory is not perfect and there are hundreds of things to play with.

Learn each slider individually before you start stacking things up.  Every educator has a preferred working order.  Copy one that makes sense, but alter it if it helps you make a workflow that works for you.  Your goal is to get to the point where you can look at an image, see a single change you want, and know which slider to go to and where you might want to start with the adjustment.  You wont need 20 applications.  If you actually do this, you will be astounded by what you can do with the things you already own.

Experimentation will take some time.  Its also a huge amount of fun, and always remember, you arent ruining anything because you always have your untouched originals.

Layers in Lightroom? Absolutely!

Perfect-Layers-2-onOne-Software.jpg

The number one draw for photographers to use Photoshop is Layers, at least according to those who would know.  Let's not kid ourselves, Layers is an awesome function but only barely touches the depths of design genius that Photoshop can unlock.  But, what if you only have Lightroom and REALLY NEED the functionality of Layers, but don't have the cash or time to get into Photoshop? It's all good.  Just click the graphic to the left and download Perfect Layers 2.  It's free.  It brings the power of Photoshop style Layers to Lightroom.  For free.  It's easy to use and plugs right into your workflow.  You call it as an external editor in Lightroom like any other plugin.  Did I mention the part about free?

It also works with Photoshop and Apple Aperture as well as in standalone mode.

Once you open an image in Perfect Layers, you can do all those cool layerly things that you want to do, like retouch, mask out section, control blend modes or add more layers with colour blends.  Heck it also comes with Perfect Effects 3, also at no charge so you leverage over 20 custom photo styling effects.  For free.

Now you are probably asking why the heck the nice people at OnOneSoftware would give these amazing tools away for free.  They aren't insane.  But the tools are so good, it might (should) encourage you to try out their full suite for 30 days to see if (how) it will make your post-processing workflow easier, richer and faster. There's a lot to like in the suite. The coming Perfect Photo Suite 7 has a number of modules including;

Perfect Layers 3 Perfect Portrait 2 Perfect Effects 4 Perfect Resize 7.5 Focal Point 2 Perfect Mask 5 and the brand new Perfect B&W

I like the way these tools integrate into Lightroom. I also like that OnOneSoftware make available a stack of USEFUL Lightroom presets at no charge. LR presets are available in lots of places but with rare exceptions, they're worth what you paid for them. The OnOne presets are usable, and provide a great starting point for your own creativity.

In fact you can order Perfect Photo Suite 6.1 by clicking the banner below and get Perfect Photo Suite 7 at no charge when it is released. So you can get to beautiful work today and be assured to get the new version as soon as it ships.

Give Perfect Layers 2 a shot. The photo you save may be your own.

Sharpening in Lightroom

Fullscreen-Unsharpened.jpg

It's often said that all digital photographs will benefit from some sharpening. Judging by the number of add-ons, plug-ins, and even the diverse tools in editing tools, the marketplace would agree. Indeed sharpening when applied well can really make a photograph better. Lightroom users have historically felt left behind when it comes to sharpening with the not completely invalid perception that sharpening in Lightroom has been akin to throwing paint at the wall. With Lightroom 4, things improved significantly, but there is more there than meets the eye.

Let me be clear. You have a lot more granular control of sharpening in Photoshop CS6. You in fact have more control over sharpening in Nik Software's awesome Sharpener Pro. According to Adobe's Brian Hughes in his session at Photoshop World, while Lightroom and Adobe Camera Raw both benefit from enhancements to their sharpening engines (it's the same engine), Photoshop CS6 takes sharpening to a brand new level and its local sharpening is the best ever.

Good to know. What if you don't own or cannot afford Photoshop CS6 or even an excellent add-on like Sharpener Pro? Lightroom brings a lot to the table.

First, let's define what we mean by sharpening. In principle, what sharpening does is increase contrast in edge boundaries creating the image of greater sharpness. Really it is playing with the pixels to make the distinction of an edge more visible. We all know that increasing contrast increases apparent sharpness when used judiciously, sharpening is a very specific application of increasing contrast.

Global vs Local

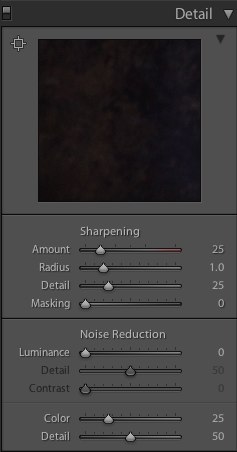
Lightroom has two adjustment modes. Global is what we see first in the Develop module. In the graphic you can see the sliders that make up the Sharpness control. This graphic is from Lightroom 4.1 Here's what they do.

  • Amount - The amount of sharpening applied, meaning the strength of the application of the sharpening algorithm
  • Radius - The pixel range around which sharpening gets applied. Default is 1.0 Higher than about 1.2 produces "interesting" results. Less than 1.0 becomes less distinctive
  • Detail - Allows more finite control over the sharpening of high frequency details. A sharp edged leaf can look oversharpened pretty quickly, use this slider to reduce that oversharpened look
  • Masking - This is the real magic in the global sharpening, and it's default setting is 0 or no masking. If you've ever learned to use high pass filters to do sharpening in Photoshop this tool is your friend.

Local mode means using an Adjustment Brush as seen in this panel.  An adjustment brush is a local change that does not apply to the entire image.  This is useful if you want to sharpen the iris of a model but not the skin texture.  Note that this control does not have the same level of granular control in the single slider that the global sharpening tool has.  You can however use the tools to control the feather of your brush and use the auto-mask option for the brush to exercise more control.  Use of a tablet with a pressure sensitive pen will also permit you significantly more control than just a mouse or touchpad.

Sharpening an Image

The first rule of sharpening is to find areas where you will want to really judge the level of global sharpening.  Flat areas like open sky are not a good choice, although you will want to be zooming in and out to see what is happening overall.  Failing to zoom in can result in over-sharpening because you simply cannot see what is happening.  Remember the Z key.  It's how you quickly zoom in and out.  The thumbnail view in the upper left corner allows you to move your zoomed area around the image without exiting the tool you are using.

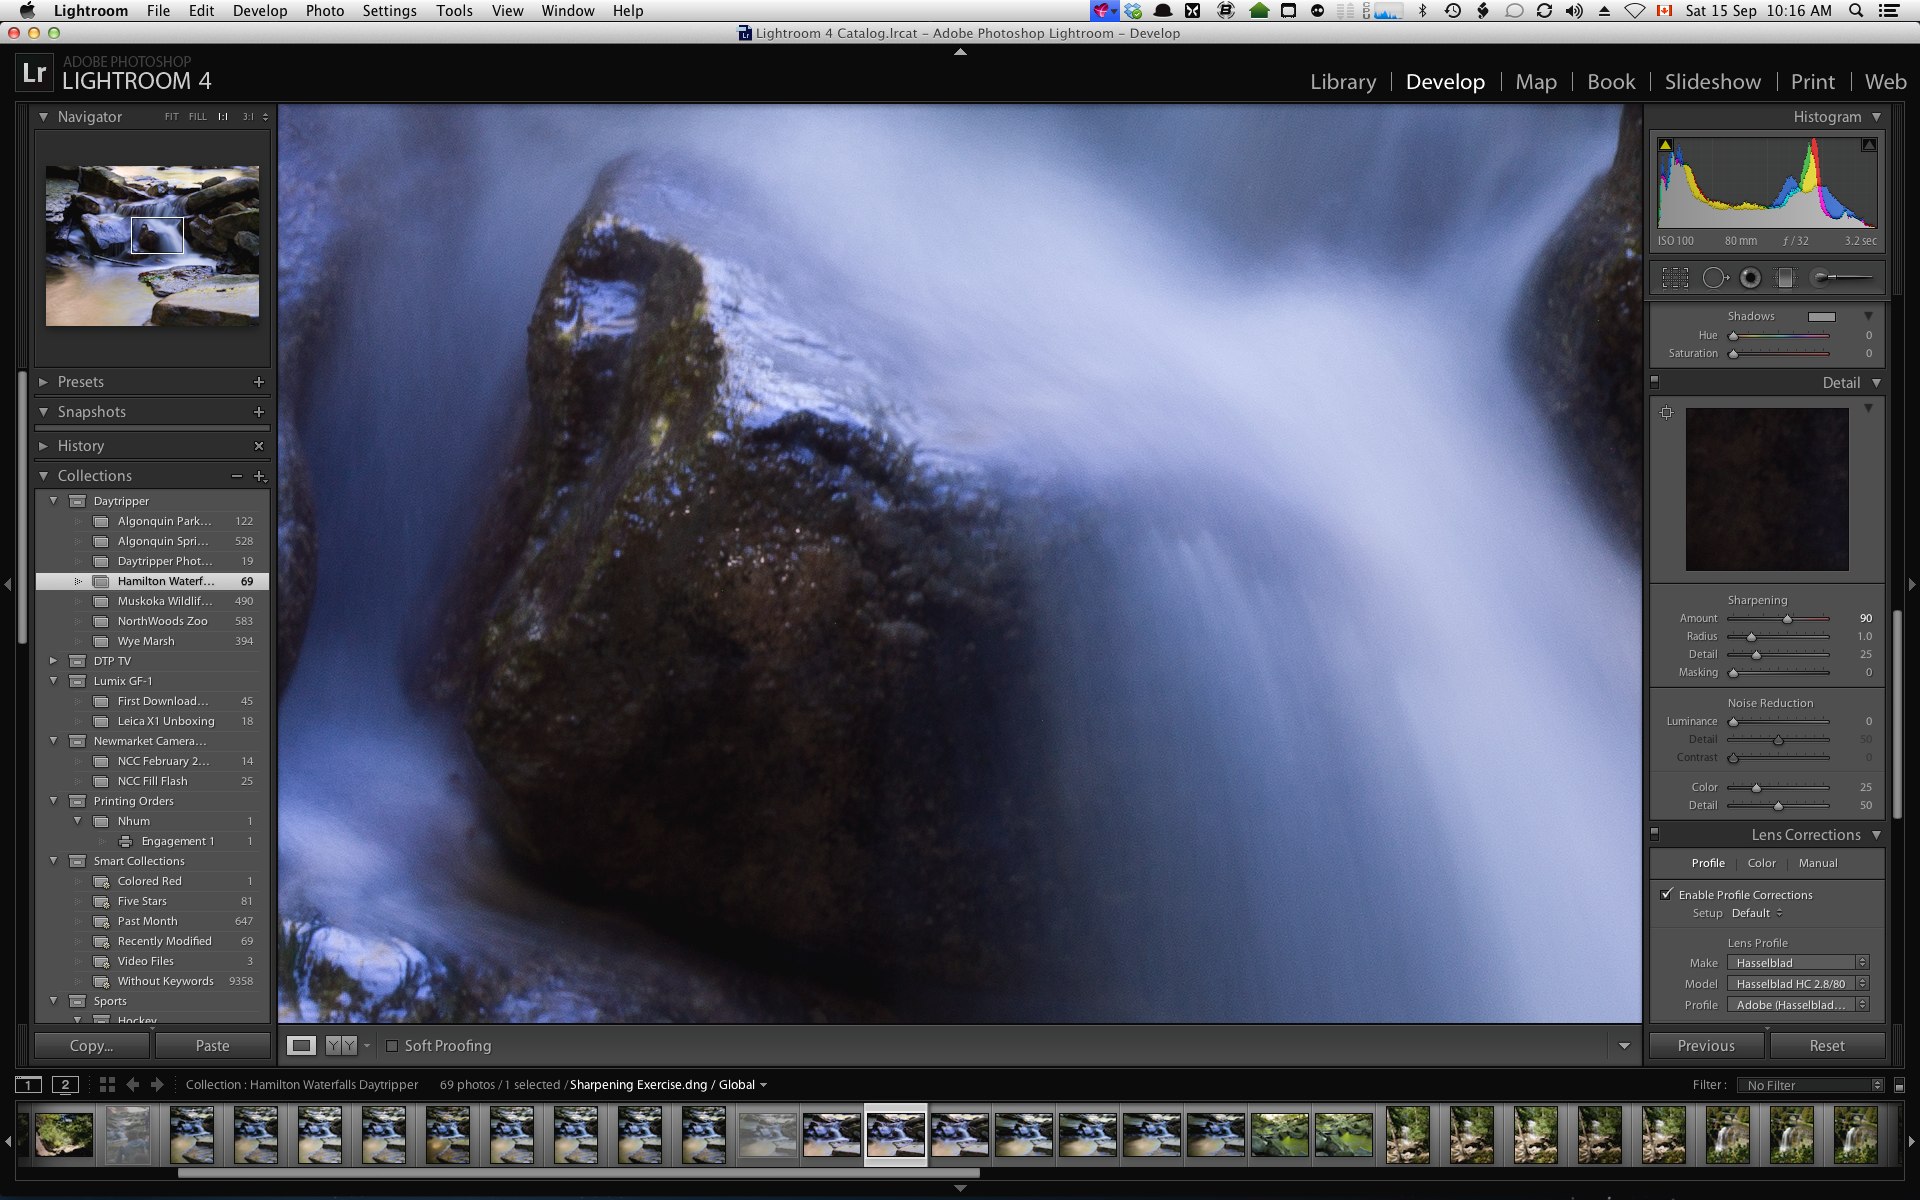
In the first screen grab we see an image in Lightroom that will be a nightmare for generic sharpening.  It has areas where we want plenty of sharpness (the rock detail)  and areas where we definitely do not want sharpening (the flowing water).  Applying global sharpening here could be really bad.

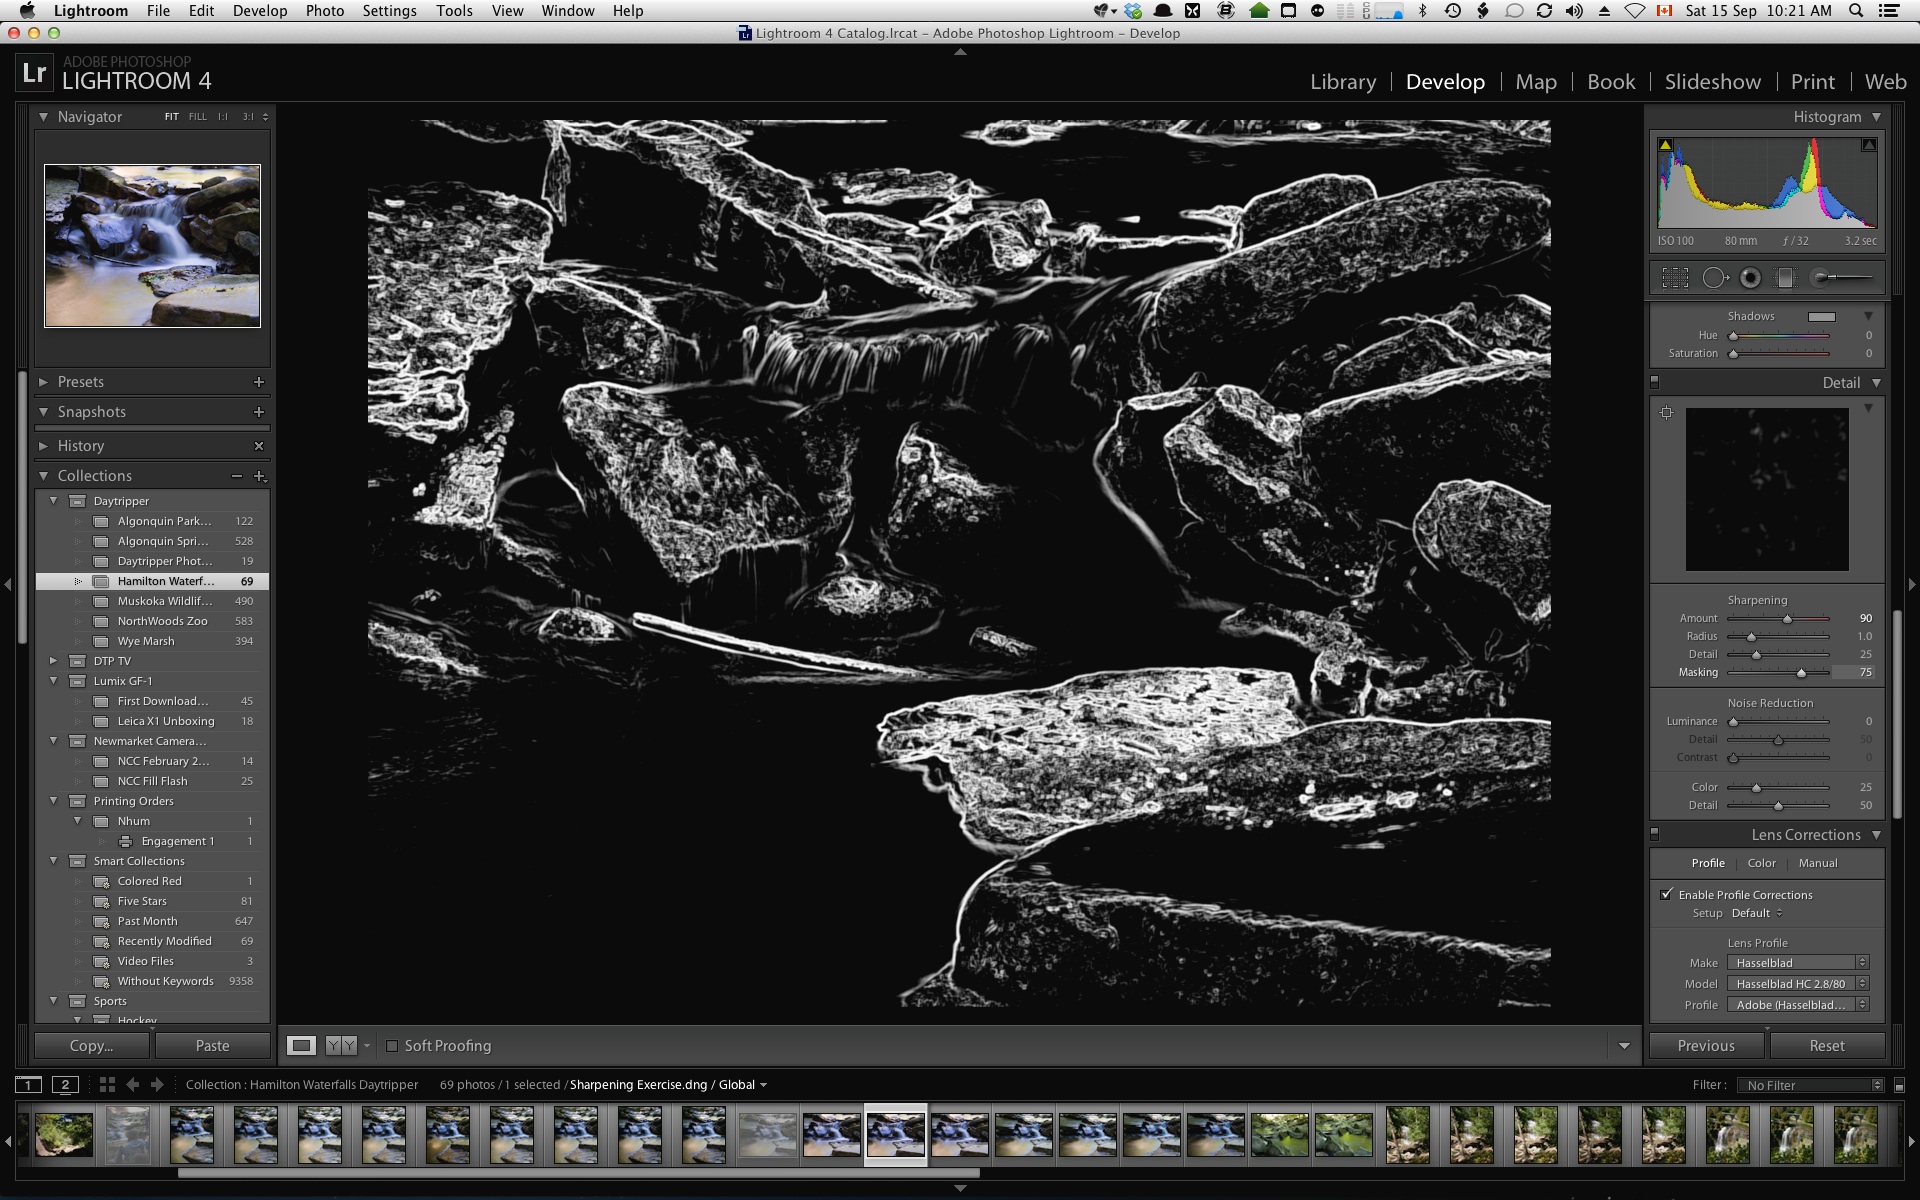
This next screen grab shows the use of the masking slider with the magic trick engaged, holding down Option (Mac) or Alt (PC) while moving the slider.  In this case we see very close to the default of zero, pretty much all the edges the sharpening engine finds will be sharpened.  No, this is definitely not what I want.  Anything that is white in this view will be sharpened.

This next screen grab shows the masking slider adjusted so almost none of the water areas are sharpened but that I am still sharpening the rock areas.  This is a much more pleasant level of control and results in a better image.  We see a much tighter level of control of what will be sharpened, only the white areas, much like the popular high pass filter sharpening in Photoshop, but without all the work.

Next we go into Local sharpening mode using an Adjustment Brush.  You'll see that I have the auto-mask turned on and that I am also using the overlay mask option.  Remember that the O key toggles the overlay mask on and off.

One of the real benefits of using an Adjustment Brush is that the changes you make are non-destructive.  As you can see in the image below, Lightroom can leave a telltale behind to show you where the adjustment brush settings are so you can find and adjust them later on.  By selecting an Adjustment Brush control point you can remove all the changes made by that brush by hitting the Delete key.  Or, simply select it and go to the controls panel and reset the control settings for that brush to suit.  This would be like leaving all the Layers intact in a PSD file so you can make changes later on.

Brush Settings

You see in this capture that the adjustment brush can have multiple settings made to a single brush.  For example when using the Sharpening brush on the green leaves I also pushed up on the Clarity.  This changed the brush type to Custom but did not remove the initial Sharpening setting.  We mostly all understand that Size refers to the overall brush size and that Feather refers to how quickly the brush edge forms.  What many folks don't understand is the difference between Flow and Density.

Brush flow allows you to control how many passes or how much pressure is required to apply the maximum effect.  For example if you set Flow to 25 and Exposure to +1, your first pass would only increase exposure by 1/4 stop.  You'll need four passes to achieve the full stop allowing you much more granular brush control.  Brush density defines the maximum that any effect can possibly have.  Think of this as a safety valve.  Suppose you set a brush with Exposure +2 but Density at 50.  Now no matter how hard you press or how many passes you make with the brush, the exposure adjustment by the brush will never be more than 50% of the maximum value.  This really enhances your level of granular control and protects against overdoing something.  I want to thank Julianne Kost of Adobe for explaining this to me.

Conclusion

While you can certainly leverage sharpening in Photoshop or marvellous third party tools such as Nik Software's Sharpener Pro, as a Lightroom user, you owe it to yourself to explore just how rich Lightroom's sharpening experience can be in advance of spending money on other software.


Portrait Retouching - The Good, The Bad and the Truly Execrable

This is not a screed against portrait retouching.  Whether you retouch portraits is entirely your business and to some extent, the business of the model. It is a screed against laziness while acknowledging truth in advertising.

Great retouching is an art.  It takes a lot of time to be consistently good at the process and while the tools have become easier to use, technology, however good still is really only a type of brush for the artist.  I am a decent retoucher on my best day, there are lots of people who have put in more time, built more skill and do a way better job.  My frustration lies in the illusion perpetrated by an increasing number of software providers that their product will give you perfect portraits or make you an expert retoucher in minutes.

As Heinlein wrote a very long time ago, TANSTAFFL - there ain't no such thing as a free lunch.  I admit that I have downloaded trials of some of these commercial packages and in every case, they are all very much like using a cannon to go after a rat.  You will get the rat, but you will also leave at least one large smoking crater behind as well.

Take a close look at the images in the ads.  To credit the vendors, the ads are accurate.  Where real people have blemishes, pores, zits, bushy eyebrows, dry lips, yellow teeth, yellowed eye whites, facial hair, ear hair, nose hair and myriad other alleged sins of existence, the retouched photos have none of these things.  Unfortunately they look like they've been retouched with driveway brush and bear little resemblance to the real person.

Every human is critical of how he or she looks in photographs to some extent and we all have some foible, however minuscule that we believe shouts from the rooftops, that we would prefer was never seen nor heard from ever again.  A great retoucher can make the adjustments to manage these things without making the model look like a reject from Madame Tussaud's Wax Museum.

Our cameras and lenses are very good, and as a Hasselblad shooter, I have had models cringe when they see the RAW proofs because the camera does actually capture everything.  Proper lighting will always help, but dependency on retouching software should never be a given.  In a series of tests with multiple iterations of these "perfect" retouchers, the tool acts like a #4 trowel, hurling corrections measured in gallons when subtlety is all that is needed.

It's ok to remove minor flaws, it's not ok to make your model look inhuman or not like him or herself, UNLESS that's what you are being paid to do.  If that's the outcome these global retouchers will save you tons of time because they are cannons to the rat.  However, if you want to produce really exceptional portraits of people while not morphing the model into a mannequin, invest in yourself and learn to retouch with grace and subtlety.  There are numerous resources available, one example being Scott Kelby's Light It, Shoot It, Retouch It book.  It's not the only choice but if you are looking, it's an excellent place to build skills.

Support the Photo Video Guy by buying it here.

Lightroom 4 First Day Experience

Adobe made Lightroom 4 available for purchase today and being the devoted Lightroom sort, I bought my upgrade and downloaded the new software. Installation was as simple as one would expect and following a very rapid catalog update, especially considering the thousands of images in my primary catalog, I was off to the races.

I opened my latest collection, a series of images I shot as tests when I was teaching for Bryan Weiss' Daytripper Photo business at his recent portrait event.  I didn't get to shoot a lot since I wanted to ensure that the students were getting the time, but I had grabbed a few with the Hasselblad H4D-40 of our professional model and the short notice stand-in of my daughter Dagny when our second model pulled a no show.

The Hassy makes really good images as one would expect and one of the very nice things about Lightroom is that it has the lens information already encoded for selecting when choosing the lens profiles.  The new version also brings process version 2012, which even with the very crisp studio lighting I employed (my wonderful Bowens Gemini 1000 Pros) I would say that the new process version is nicer.

I did no real editing in Lightroom other than to apply a custom white balance that I created using the Colorchecker Passport plugin from a shot with model Shannon holding the Passport.

I then took the photograph into On One Software's Photo Suite 6 as I had not given it a solid press since installing it.  The new suite loads automatically into its Layers 2 component.  I moved right into Perfect Portrait and sharpened and brightened the eyes, added some saturation to the mouth and cleaned up a few blemishes using the skin tune functions.  Very fast and very controllable.

I then clicked into the Blur service (aka Focal Point 2) and using their "bug" set up a nice darkening vignette and applied a bit of blur to the area outside her face.  Again, very controllable although I felt the default setting was a tad aggressive.  The bug allows you to control the blur and non-blur mask areas very quickly.  Once done, I applied the changes I had made and the photo returned to Lightroom as a PSD, ready for re-editing if needed.

I was very happy with the image so I wanted to make a print.  What paper should I use?  I decided to try some 13x19 from an Inkpress Paper Sampler and so printed the photo twice, once on the Warm Tone Rag 300, a really nice two sided all cotton rag and the second time on Inkpress' respected Glossy Canvas.  I used Lightroom to select the ICC and opted for standard print sharpening and matte and glossy paper respectively.  I typically use the Perceptual resolution setting and it worked well in this printing exercise.

My printer is the Epson Stylus Pro 4900.  It's a monster but I love the output quality and its incredible speed and paper handling capability.  The drivers were gacked (a known issue with the Apple drivers for OS X 10.7) so I had to install the Epson drivers directly which gave me some oddities in the print dialog box.  I like using ICC profiles for the paper but had to choose ICC profiles for the 7900/9900 as profiles for the 4900 did not exist and past experience trying other profiles on other Inkpress papers has been less than stellar.  I do wish Inkpress would provide more profiles specifically for my printer.

Despite a misstep on my part loading the canvas at first, the prints came out beautiful right away and are only improving as I let them set before mounting.  One of the other things I really like about the 4900 is that while a complete refill is a mortgage payment, each of the cartridges holds 200ml of their Ultrachrome pigment inks, instead of the ludicrous 13ml found in most photo printer cartridges.  Folks do ask me what printer to buy and while I favour Epson, I always suggest to anyone vaguely serious to get up model to one that uses reasonably sized ink cartridges.  Epson used to have a really bad rep for clogged print heads that rendered the whole device a paperweight but their new teflon coated nozzles don't have this problem.

I'll be heading out tonight for mattes and frames.  A really great exercise today.

Sync audio in your videos with ease with PluralEyes

I hate to think that I had been procrastinating editing some videos I shot for some friends, because I really had not been, although the work required a task that really bugs me.  Despite my DSLR cameras being great for recording HD video, their audio capabilities are well, open for improvement.  So I do what lots of videographers do.  I let the camera mic run and also use external mics with an outboard audio recorder. My rig is very simple.  Basically I use Sennheiser wireless lavaliers into a Zoom H4N field recorder and save the files as WAV format.  This gives me very high quality audio that I can lay into my non-linear editor as an extra track beside the video with embedded audio from the DSLR.  The Canon DSLRs also record audio through either the built-in mic or a frame mounted shotgun.  I had tried the Beachtek box and while it works, I've had issues, and even though the Rode Videomic is very good, it's one mic and doesn't give nice stereo separation when shooting a two person standup.

I am using Final Cut Pro X which was recently updated by Apple to 10.0.3.  This brought support for XML controls and that enabled the use of a tool I had looked at once in the days when I used Final Cut Studio.  The tool is called PluralEyes and comes from Singular Software.  You can download a trial of the product here.  If you want a non-integrated audio track tool, they also do a tool called DualEyes.

FCP X purports to be able to sync multiple audio tracks together.  It can.  Mostly.  With multiple retakes and inconsistent start times between audio and video, I have found that it works ok, but not perfect and not necessarily consistent.  PluralEyes is a special purpose tool, that carries a price tag of $149 USD.  So it's not like the free that's built in to FCP X.  You should expect something really great for that kind of money, and my experience today says you get it.

I had eight separate videos to edit, each with multiple takes and audio files.  So long as I kept them straight, PluralEyes did the job quickly and effectively.  While it is a standalone app, it integrates very nicely into your FCP X workflow.

Here's the workflow I used today.

  1. Create a project inside an event in FCP X for each video.
  2. Find all the segments and import them into the Event Library (what we used to be call the bin)
  3. Open each audio segment in The Levelator and let it do it's magic to even out the audio levels.  I use the Levelator all the time for editing spoken audio content.  It's awesome and free.
  4. Place the video and audio clips in the timeline for the project and line them up appropriately
  5. Step up a level to the Project Library and do a File | Export of the XML for the project
  6. Launch PluralEyes and load the XML file created above into it.
  7. Choose SYNC.  I prefer not to have it replace the camera audio even though this creates a step for me.
  8. Once done, and it is very quick, a new project is created with the same name as the original with the word synced appended.  Go into this project and you'll see your video and audio tracks properly aligned and in sync
  9. Select the combination track from the camera and Detach the Audio
  10. Delete the camera audio track
  11. If your audio is only one sided stereo, change it to dual mono to load both Left and Right channels.  Adjust overall levels if needed using the db drag line in FCP X
  12. Select the camera video track and the good quality audio track.   Now make them into a Compound Track.  This makes editing much easier.
  13. Cut the compound track to your liking, adding your transitions, intros, outros and the like and finalize the project.

That's it.  It's like working with a professional video / audio track from pro gear.  PluralEyes saves a lot of time and makes life much easier.  I have not discovered a down side, other than the license cost of the software, but for the hours it saved me, it's worth it.  You can try the software for free before you buy which is very good of the manufacturer.

PluralEyes is available to work with Final Cut Studio, Final Cut Pro X, Avid Media Composer, Adobe Premiere Pro, Sony VEGAS and Edius.  The 30 Day trial is not impaired in any way that I discovered.

OMG! The Best Photo Editor You've Ever Used for Under $20!!!!

Full Disclosure : I am not employed by Nik Software.  I do not receive any compensation from Nik Software.  Nik Software does not have a clue who the heck I am, other than having accepted my money for their products. I'm a known champion of Snapseed on the iPad.  It just rocks.  So imagine how excited I was to discover that as of January 12, 2012, that the amazing Snapseed is now available on the Mac.

Nik has done a really fine job of taking the gesture oriented iPad app and transposing it to the mouse/trackpad interaction model of the Macintosh.  The software runs on OS X 10.6.6 or later and OS X 10.7.2 or later and the app size is about 28mb.  You'll need a 64 bit CPU and Core 2 Duo or greater capability.  Oh yeah, you'll also need $19.99 at the Mac App Store.

For those who have suffered without Snapseed, here's a short summary of what it brings to you.

Basic services include cropping, rotation, straightening and the ability to quickly select standard aspect ratios.  You can also correct white balance, saturation, contrast and overall ambience.  For those who have used Nik's most awesome plugins, Snapseed also features Nik's powerful control points so you can exercise highly selective control over what sections of your image get edited.

Once you've done the basics, you'll want to look at some of the extra options.  None of these capabilities are trivial and you really want to get in there and play around, but for the short list you have Black&White, Vintage Film and Drama.  Want that grunge look?  Try out the Grunge functions.  Have some buildings falling over?  Try the Tilt and Shift (SO AMAZING BECAUSE IT'S SO SIMPLE) and fix them right up.

Want to pull out more detail?  Nik has brought their Structure control over from their plugins and of course there is powerfully simple sharpening as well.  Like that Bokeh look?  Choose centre focus.  Want to put a cool frame around your image?  Try out Organic Frames.

Once you've finished your work, share your photos via email or on to Facebook or Flickr.

Oh yeah, it works with JPEGs, TIF, and RAW files!  And it's under $20

The following images are from Nik's page on the App Store


Masking Simple Enough for Me

Photoshop has very powerful masking tools, no doubt.  I don't consider myself an advanced amateur in this area at all, as my Photoshop skills development is a work in progress.  I was recently challenged to mask a photo to pull my cat out of this cluttered snapshot.

I had been reading Digital Photo Professional and seen an ad from Topaz Labs for a product called Remask The hyperlink will take you to the product page.  Topaz is one of those great companies that enhance the usability of tools like Photoshop, Lightroom and Aperture.  A lot of these powerful programs do all many of cool things, but their power also brings complexity and sometimes you just want faster and simpler.

Here's the image from the ad that caught my eye.

NewImage


Frankly it looked a bit too good to be true.  But I went to the site, downloaded the evaluation product and watched the tutorials at http://www.topazlabs.com/tutorials/remask.html#1

It all looked good and so I tried it with the silly cat snapshot.

Cat


Now this is not the cleaned up or completed image, it's the png of literally my first pass.  What is so cool is that information like whiskers and fur are so well picked up and managed by the tool.  I am sure I could do this in Photoshop.  I'm not sure I could have done it in less than a minute.

The final "cat in space" is a pretty whacked idea and so I will spare everyone that outcome but I was able to focus my time on the result and not spend a lot of time in the masking process.  Take a look at Remask.  It's fast, it's awesome and if you will be doing this sort of thing, very inexpensive.  I will be buying a license.

Peace.

Ross