Sharpening in Lightroom
/It's often said that all digital photographs will benefit from some sharpening. Judging by the number of add-ons, plug-ins, and even the diverse tools in editing tools, the marketplace would agree. Indeed sharpening when applied well can really make a photograph better. Lightroom users have historically felt left behind when it comes to sharpening with the not completely invalid perception that sharpening in Lightroom has been akin to throwing paint at the wall. With Lightroom 4, things improved significantly, but there is more there than meets the eye.
Let me be clear. You have a lot more granular control of sharpening in Photoshop CS6. You in fact have more control over sharpening in Nik Software's awesome Sharpener Pro. According to Adobe's Brian Hughes in his session at Photoshop World, while Lightroom and Adobe Camera Raw both benefit from enhancements to their sharpening engines (it's the same engine), Photoshop CS6 takes sharpening to a brand new level and its local sharpening is the best ever.
Good to know. What if you don't own or cannot afford Photoshop CS6 or even an excellent add-on like Sharpener Pro? Lightroom brings a lot to the table.
First, let's define what we mean by sharpening. In principle, what sharpening does is increase contrast in edge boundaries creating the image of greater sharpness. Really it is playing with the pixels to make the distinction of an edge more visible. We all know that increasing contrast increases apparent sharpness when used judiciously, sharpening is a very specific application of increasing contrast.
Global vs Local
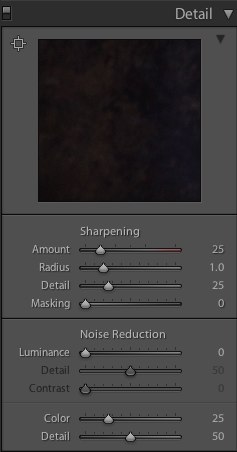
Lightroom has two adjustment modes. Global is what we see first in the Develop module. In the graphic you can see the sliders that make up the Sharpness control. This graphic is from Lightroom 4.1 Here's what they do.
- Amount - The amount of sharpening applied, meaning the strength of the application of the sharpening algorithm
- Radius - The pixel range around which sharpening gets applied. Default is 1.0 Higher than about 1.2 produces "interesting" results. Less than 1.0 becomes less distinctive
- Detail - Allows more finite control over the sharpening of high frequency details. A sharp edged leaf can look oversharpened pretty quickly, use this slider to reduce that oversharpened look
- Masking - This is the real magic in the global sharpening, and it's default setting is 0 or no masking. If you've ever learned to use high pass filters to do sharpening in Photoshop this tool is your friend.
Local mode means using an Adjustment Brush as seen in this panel. An adjustment brush  is a local change that does not apply to the entire image. This is useful if you want to sharpen the iris of a model but not the skin texture. Note that this control does not have the same level of granular control in the single slider that the global sharpening tool has. You can however use the tools to control the feather of your brush and use the auto-mask option for the brush to exercise more control. Use of a tablet with a pressure sensitive pen will also permit you significantly more control than just a mouse or touchpad.
Sharpening an Image
The first rule of sharpening is to find areas where you will want to really judge the level of global sharpening. Flat areas like open sky are not a good choice, although you will want to be zooming in and out to see what is happening overall. Failing to zoom in can result in over-sharpening because you simply cannot see what is happening. Remember the Z key. It's how you quickly zoom in and out. The thumbnail view in the upper left corner allows you to move your zoomed area around the image without exiting the tool you are using.
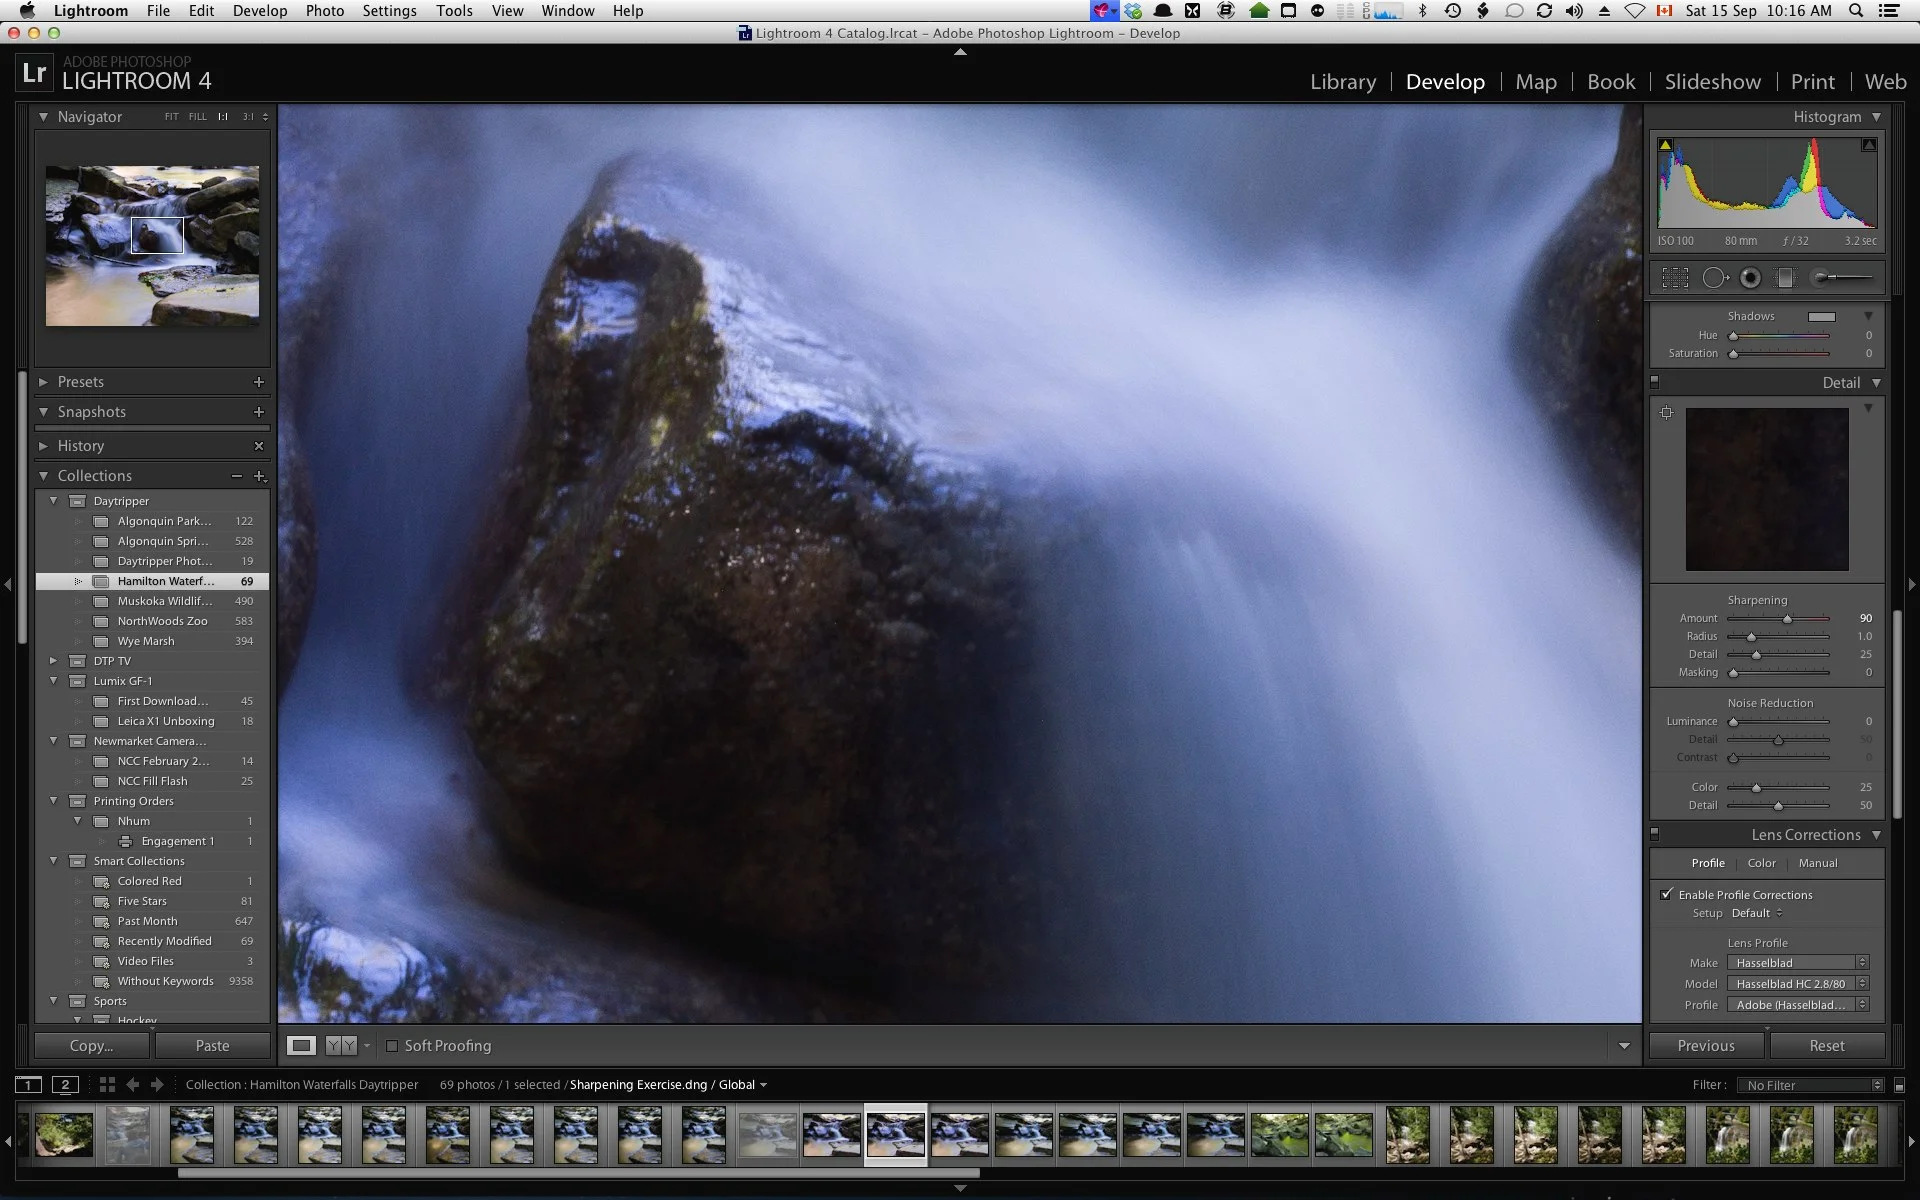
In the first screen grab we see an image in Lightroom that will be a nightmare for generic sharpening. It has areas where we want plenty of sharpness (the rock detail) and areas where we definitely do not want sharpening (the flowing water). Applying global sharpening here could be really bad.
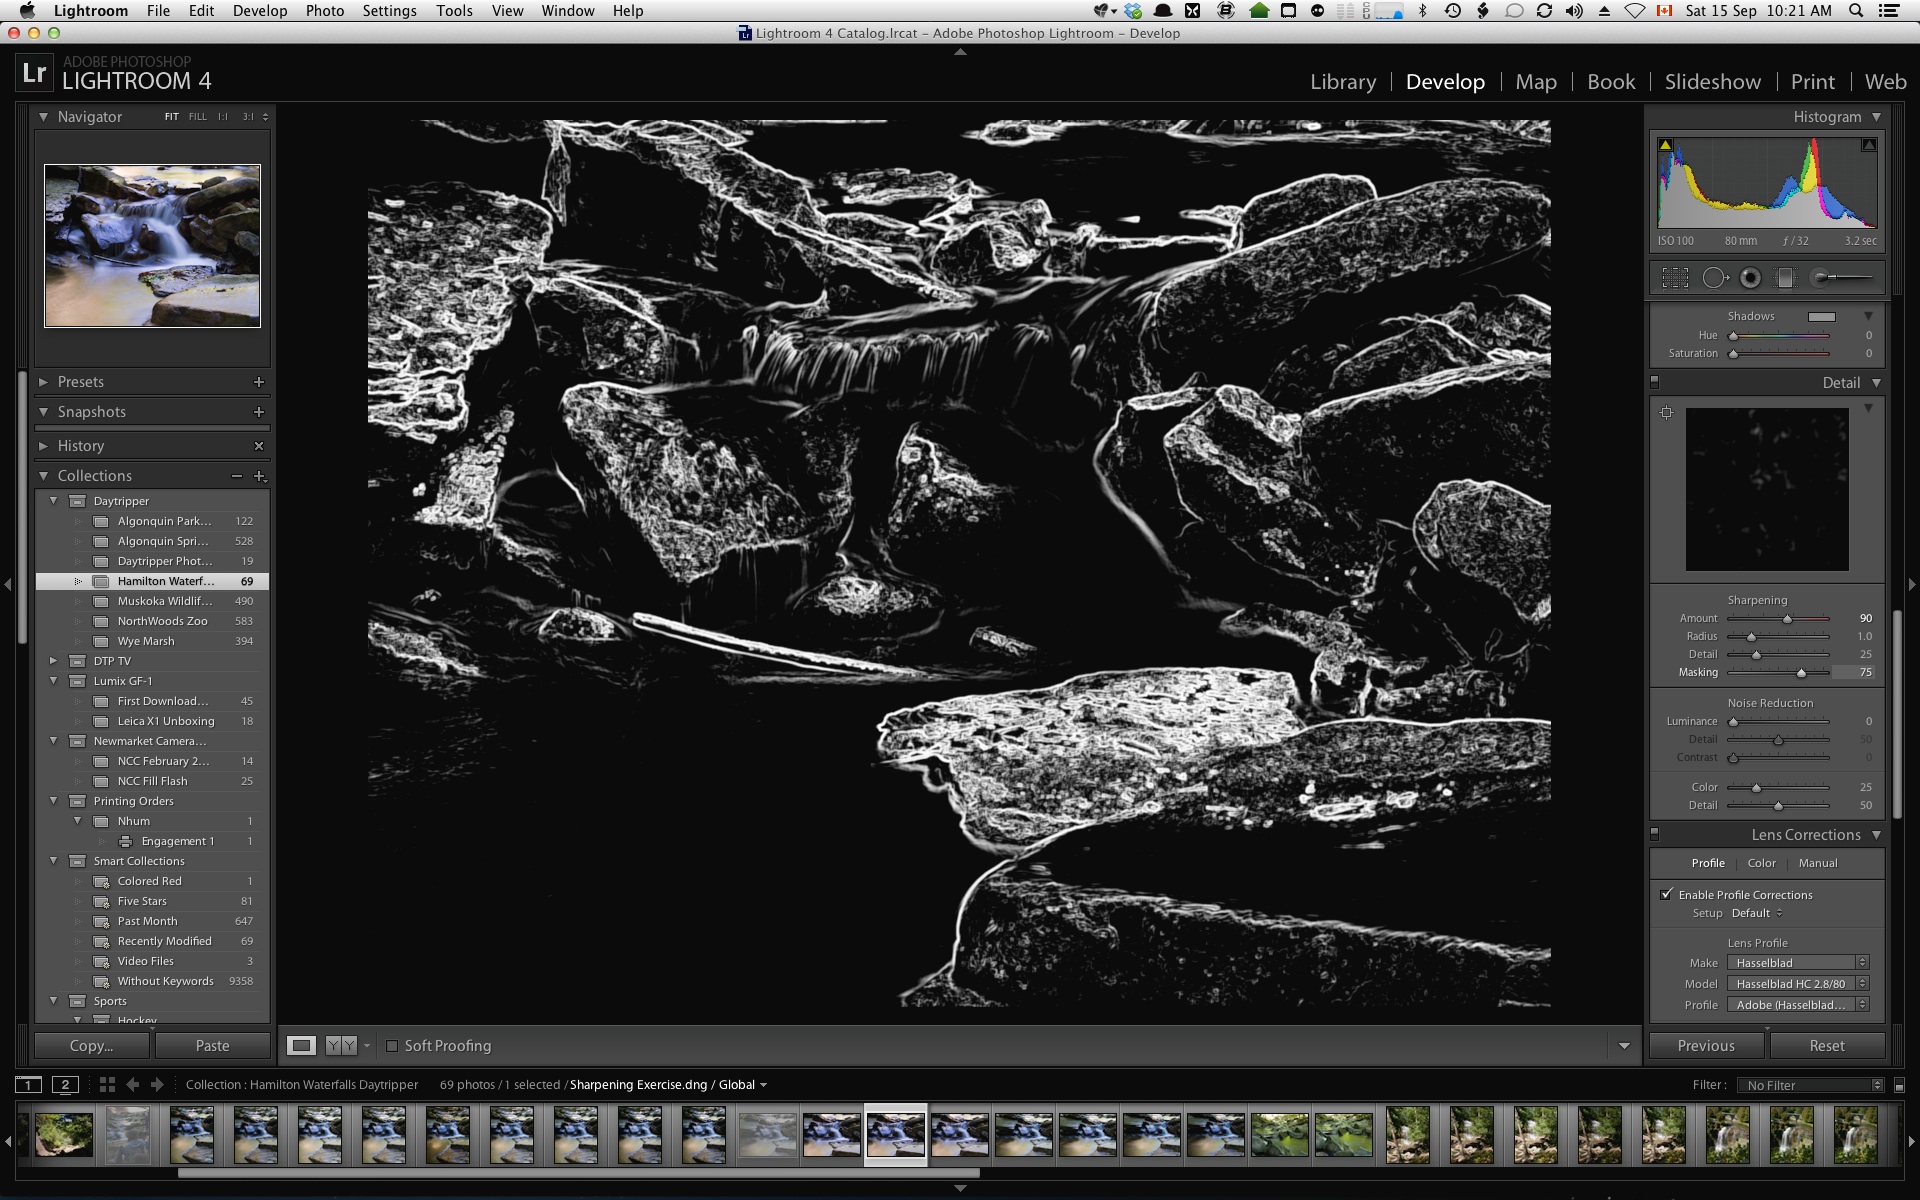
This next screen grab shows the use of the masking slider with the magic trick engaged, holding down Option (Mac) or Alt (PC) while moving the slider. In this case we see very close to the default of zero, pretty much all the edges the sharpening engine finds will be sharpened. No, this is definitely not what I want. Anything that is white in this view will be sharpened.
This next screen grab shows the masking slider adjusted so almost none of the water areas are sharpened but that I am still sharpening the rock areas. This is a much more pleasant level of control and results in a better image. We see a much tighter level of control of what will be sharpened, only the white areas, much like the popular high pass filter sharpening in Photoshop, but without all the work.
Next we go into Local sharpening mode using an Adjustment Brush. You'll see that I have the auto-mask turned on and that I am also using the overlay mask option. Remember that the O key toggles the overlay mask on and off.
One of the real benefits of using an Adjustment Brush is that the changes you make are non-destructive. As you can see in the image below, Lightroom can leave a telltale behind  to show you where the adjustment brush settings are so you can find and adjust them later on. By selecting an Adjustment Brush control point you can remove all the changes made by that brush by hitting the Delete key. Or, simply select it and go to the controls panel and reset the control settings for that brush to suit. This would be like leaving all the Layers intact in a PSD file so you can make changes later on.
Brush Settings
You see in this capture that the adjustment brush can have multiple settings made to a single brush. For example when using the Sharpening brush on the green leaves I also pushed up on the Clarity. This changed the brush type to Custom but did not remove the initial Sharpening setting. We mostly all understand that Size refers to the overall brush size and that Feather refers to how quickly the brush edge forms. What many folks don't understand is the difference between Flow and Density.
Brush flow allows you to control how many passes or how much pressure is required to apply the maximum effect. For example if you set Flow to 25 and Exposure to +1, your first pass would only increase exposure by 1/4 stop. You'll need four passes to achieve the full stop allowing you much more granular brush control. Brush density defines the maximum that any effect can possibly have. Think of this as a safety valve. Suppose you set a brush with Exposure +2 but Density at 50. Now no matter how hard you press or how many passes you make with the brush, the exposure adjustment by the brush will never be more than 50% of the maximum value. This really enhances your level of granular control and protects against overdoing something. I want to thank Julianne Kost of Adobe for explaining this to me.
Conclusion
While you can certainly leverage sharpening in Photoshop or marvellous third party tools such as Nik Software's Sharpener Pro, as a Lightroom user, you owe it to yourself to explore just how rich Lightroom's sharpening experience can be in advance of spending money on other software.


