

But It Looked Great on the Camera LCD...
/
It happened again this week. A former student sent me an email, "I should give up or get a different camera. Everything looked great on the LCD but when I got the pictures into Lightroom they weren't tack sharp. I don't know what I am doing wrong and it's making me depressed." We've all been there. Let's look at getting to a happier place.
First step is always the "interrogation". I hate this part, because it deflates people who are already having a rough time, and when folks feel this way, every question sounds like a judgement. They aren't so if you've felt this way about images, here's a personal checklist to go through.
- Was my shutter speed too slow for the focal length I was shooting?
- Was I jittery at all when I shot this, or coming off a super Venti, extra shot, double cane sugar coffee?
- Was my concentration wandering or did I have a lot on my mind when I made these shots?
- Was my camera on a tripod using a lens with image stabilization turned on when it should be off?
- Was I pushing the shutter button instead of squeezing it?
- Was I using a full frame focal length lens on a crop sensor camera?
- Was I shooting single frame or burst mode?
- Did I pull off?
- Was I shooting in RAW?
Let's take a look at what to do when the answer to any of these questions is "YES"
- A known best practice is to put one over the focal length of the lens to find the recommended minimum handheld shutter speed. So if I were shooting a 300mm prime lens, my minimum handheld shutter speed would be at least 1/300 of a second. Now what if it's a zoom. This is an argued point. Some take the perspective of using the formula based on the shooting focal length, so a 70-200mm zoom at 70mm would drive a safe handheld shutter speed of 1/70. After years of helping folks, I don't buy into this. The weight and handling of the lens are always at their maximum, the lens gets no lighter at a shorter focal length. Some lenses change length with focal length as the zoom helicoids move elements. My guideline is always use the maximum focal length for the math, so that 70-200 has a minimum handheld shutter speed of 1/200 regardless of the focal length used for the shot. You might be giving up a stop or two of ISO to make this happen, but low noise blurry pictures still aren't keepers.
- Many of us consume foods and beverages that increase our pulse rate. Some of us have high blood pressure. As we get older, we may experience a bit more hand shake. Recognize it and compensate. Tripling your minimum safe shutter speed is a good idea in this scenario. My friend Nick can handhold his 500mm at 1/500 but he almost never does (at least not in the shots that I get to see). They are always 1/1500 or higher. He's a great photographer so any ISO noise that is there is not seen because the photo is great. As Rick Sammon says, "if the noise becomes super evident, then the photo itself probably isn't that good."
- We live in a demanding highly pressurized world. We have lots on our minds. Photography requires focus, no pun intended, and concentration. If you aren't concentrating on the image you are making when you make it, you are probably not maintaining proper grip, or delivering proper follow through, and even subtly, this can cause microshake.
- Some lenses with stabilization state in their manuals to turn the stabilization off when the lens is on a tripod. Others say it doesn't matter. You as the photographer need to know what your lenses require. Some people put a coloured dot sticker on the top of the barrel as a reminder, others simply get in the habit of turning stabilization off as soon as the lens goes on a tripod. It's a small thing that can make for serious frustration.
- I used to teach competitive pistol shooting. The most common issue faced by new shooters is that they would pull the trigger, not press it. A pull, or in the case of a camera shutter, a push, moves the camera, and this micro movement can cause micro blur. Instead squeeze the shutter button. A good method that works for many is to take a good and firm grip with the shooting hand with the pad of the index finger on the shutter button. Tense the muscles in the back of the hand and the shutter release will happen smoothly and may even surprise you. It takes a bit of practice but works very well. Also a deep breath in, exhale halfway and press can improve your shot stability.
- Let's say I put my 70mm-200mm zoom lens on my 7D Mark II. It's a full frame lens with a full frame image circle, but if I use it on a crop sensor camera, I am cropping into the image circle by a crop factor of 1.6x So I end up looking at only a portion of what the 200mm focal length is delivering and that crop makes it like I am holding a 320mm lens. If I were shooting at 1/200 of a second shutter speed, I might get some microshake because the "effective" focal length guides a handheld shutter speed minimum of 1/320.
- Burst mode is a good method to alleviate microshake. Instead of stabbing the button for one shot, press the button for a 3 or 5 shot burst. The follow on shots will typically be sharper as you settle in to the shot itself. Low speed burst works just fine for this and since we are not shooting film, there is no real cost for the extra exposures.
- Again I go back to the world of pistol shooting, where the term pull off in this context originates. A photographer in a hurry or not concentrating may not see the shot through or complete follow-through and by failing to do so have actually moved the camera before the shot is completed fully. If you use a viewfinder on a camera, wait for the viewfinder image to return before you move the camera. If in single shot mode, just keep the shutter button pressed (pinned) until the mirror returns and you can see through the viewfinder. If you are shooting in Live View, keep your elbows tucked in tight. More blurry shots are captured in Live View than with a viewfinder when shooting handheld.
- Remember RAW means uncooked. No processing has happened yet. A RAW file has had nothing done to it. When you import the file, some RAW preprocessors apply some level of RAW sharpening right up front. Some don't. Consistency is not a hallmark here. In fact Nik Sharpener Pro has a RAW Resharpening plugin where you turn off the presharpen in your editor and use the Nik version that may give you better results. I don't know a lot of folks who do this, but it's an option. Just remember that RAW files need some basic presharpening to help you decide on the keepers and will require post edit sharpening as well. Plus sharpening on export for web or print.
So you've been through the questions and are sure that you can answer "NO" to each one. Excellent. Oh wait, that blur problem still exists. Well it could be the lens. Not every lens is perfect out of the factory. I've shot the same model lens on the same camera with the same subject and gotten different levels of sharpness without a change in settings. It happens. You can always send a soft lens in for service and in most cases you will get back something better, but I have friends for whom it has gone the other way. Now if you have a camera that offers microfocus adjustment, you can actually address this yourself. One route is the Spyder Focus Checker. I've done focus checks on my own glass using this tool and have taken a good lens and made it great with tiny adjustments. The information is stored in the camera for each lens, and on some cameras for multiple focal lengths with a given lens. I cannot tell you that the process is foolproof or even easily understood. There is a software product called FoCal that can do this in a semi-automatic way using tethering, but it doesn't work for every camera, and your camera must have microfocus adjustment capability. It uses a focus target model and has an excellent reputation, although some users find it complicated and convoluted.
So now you know that you are good and that your lens is good but there's still some softness. Plain old software sharpening isn't doing it, and even trying Photoshop's Camera Shake Reduction Filter doesn't cut it. Now is the time for some serious math. I have found a solution that works in this situation called Piccure+. I've written about Piccure and Piccure+ in the past. These folks handle lens aberration and microshake like no one else. The software is highly specialized and when you do the fix, it takes some compute time to finish. But when it's needed it absolutely does the job.
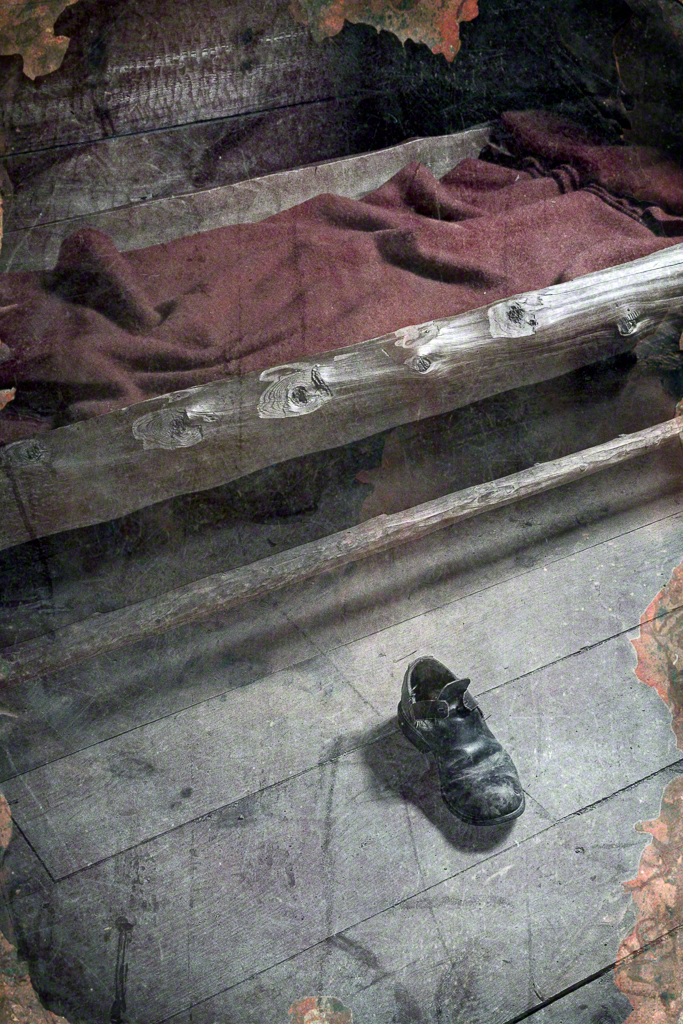
Last fall I was shooting up at Sainte Marie Among the Hurons, doing ambient light exposures in dark rooms. I wanted to capture the sense of time, dust in light beams in the images. The buildings are all wood and as anyone can tell you, wood is an effective transmitter of vibration. I had shots that looked good on the LCD, even with my trusty Hoodman loupe, but when I got the images into the computer, they were soft. I was able to determine that my very stable tripod platform had been subtly moved by the vibration of the floorboards, when other attendees were stomping around nearby or their kids were bounding around as kids do. I sent a few images on a return trip through Piccure+ and the correction it wrought turned a discard into an image suitable for editing, printing and sale. The image here, titled The Shoe of the Black Robe has been processed for it's aged and faded look, but I without Piccure+, I would have had nothing worth working with. The second image, Monk's Desk, just appealed to the woodworker in me and with the way the light was hitting the desk. The original was fine except for the microshake caused by the floor moving. It's all clean here thanks to Piccure+.

I've also used Piccure+ shooting minor hockey where the action at the net was just a bit quicker than the shutter speed I had available would freeze. Piccure+ is not just a sharpening tool. Excessive sharpening looks like it, with artefacts all over the place. You can certainly overdo Piccure+ too and it may not solve every problem, but it solves enough to be part of my core plugin kit for when everything else hasn't gotten me where I want to go. If it sounds good to you, you can even follow the link on the main page and I will earn a small commission to help keep The Photo Video Guy on the web.
Go to the Piccure site and use the coupon code "photovideo" (without the quotes) at checkout.
Thanks for reading and until next time, peace.


