But It Looked Great on the Camera LCD...

But It Looked Great on the Camera LCD...

It happened again this week.  A former student sent me an email, "I should give up or get a different camera.  Everything looked great on the LCD but when I got the pictures into Lightroom they weren't tack sharp.  I don't know what I am doing wrong and it's making me depressed." We've all been there.  Let's look at getting to a happier place.

Read More

REVIEW : Piccure Plus

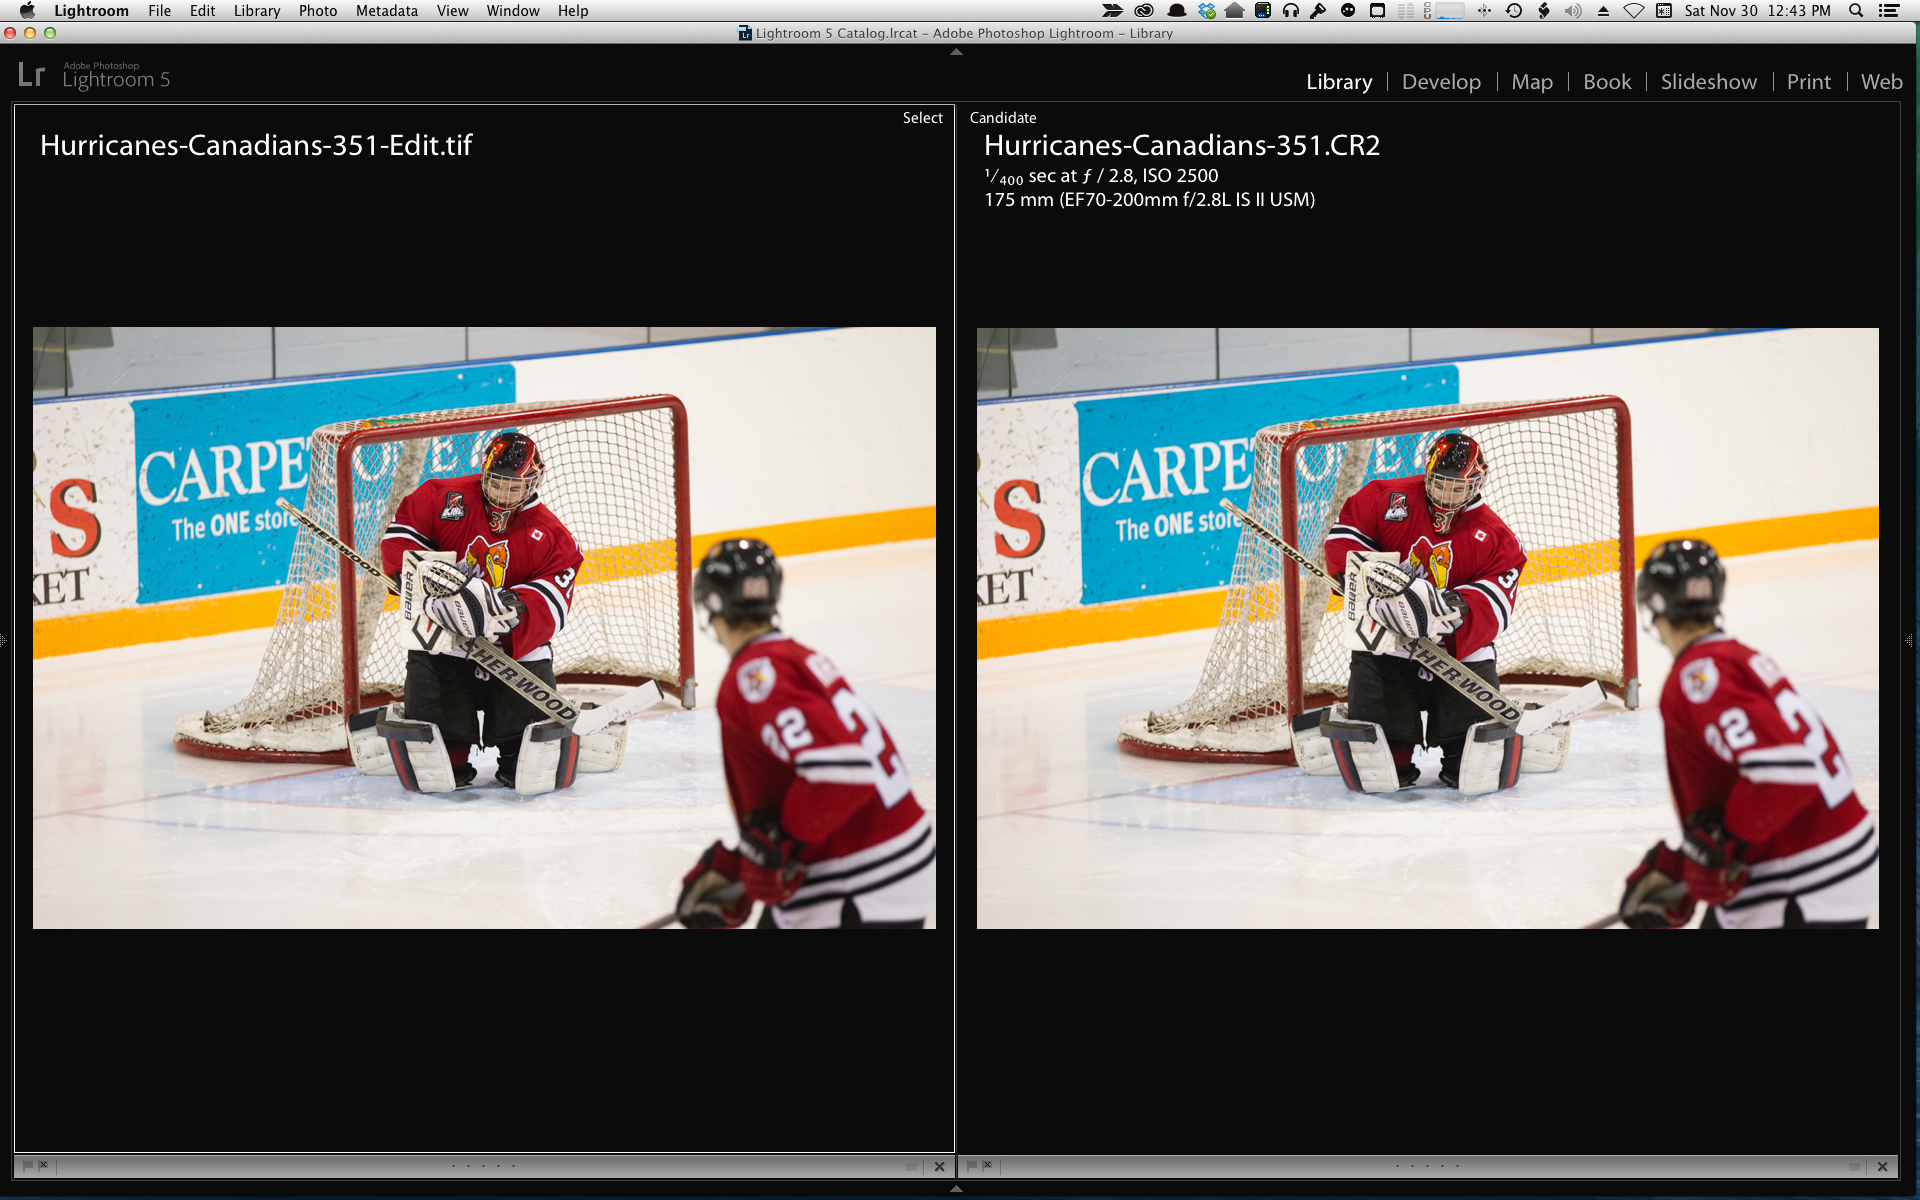
You might remember me writing several months ago about a tool to help correct camera micro-shake called Piccure.  I had questions and the manufacturers got in touch right away.  While other options, such as Photoshop, have a camera shake filter, I found that Piccure did a better job.  It was more demanding on the computer CPU because of the complex math, but that complex math ended up doing a more consistent job. What if the folks who do Piccure made it even better?  What if they added robust distortion correction, without having to buy a dedicated, albeit excellent, tool like DxO Optics Pro?  What if they "added" Lens + to Piccure and called it Piccure  Plus?  They did and it is superb.  Want to learn more?  Then read on neighbours...Piccure Plus is found here and it is a giant step forward from the already excellent Piccure.  PIccure+ is a product of a small German company called Intelligent Imaging Solutions.

The engineers have added to the exceptional Motion+ a brand new service called Lens+.

Motion+ is designed to correct camera micro shake.  This can happen when a photographer jabs the shutter release inside of squeezing it.  It can happen when the tripod is overloaded or is not so stable as the salesperson suggested.  It can happen with a long exposure where the shutter is released without a remote or cable.  It can even happen when the ground is moving beneath your stable, cable released camera as was noted in the article on "Flex" found on this site.

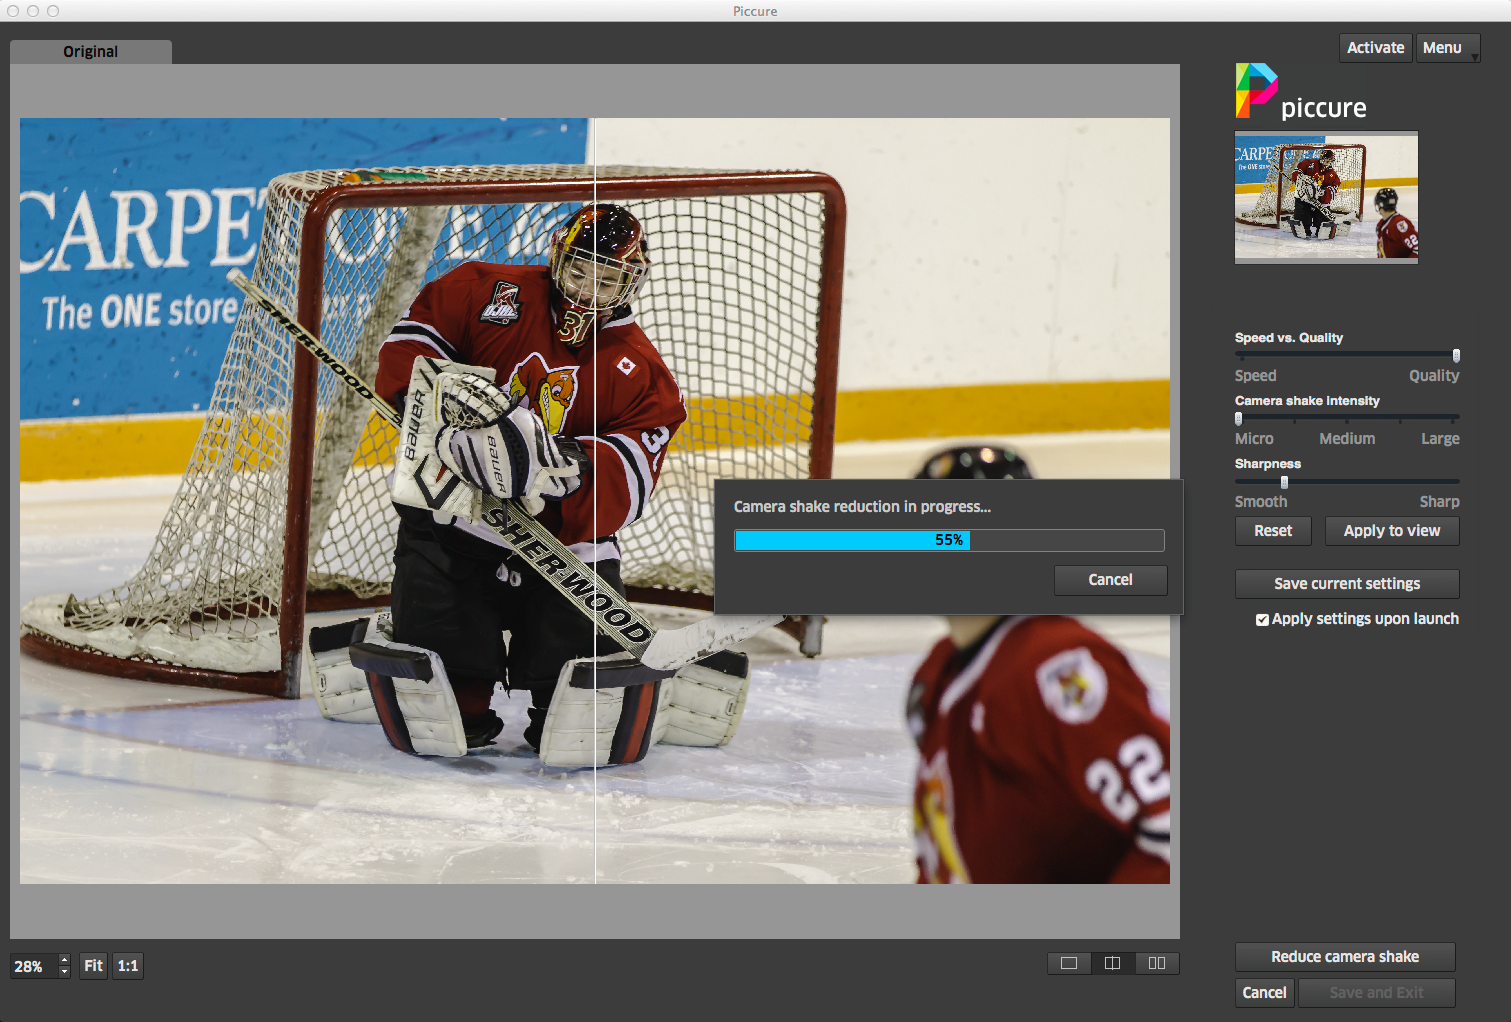
Motion+ has a number of simple settings.  Some users are confused by the sliders into believing that the setting options are linear.  They are more stepped than continuous, and while I would prefer that the engineers at Piccure would alter the sliders to include notches where the sliders can be set as is found in other software, once you learn the layout, the problem ceases to be a problem.

You choose the amount of shake reduction you want, the sharpening you want and press Preview to see what it's going to do.  Use only enough adjustment that you need, over adjusting will give you less than stellar outcomes, which is why the software starts you at very small changes.  Note that this is significant math so it will take a bit of time for the preview to build.  Be patient, it's worth it.  Motion+ is very good but can only go so far, so your handheld 2s shot on the pitching deck of a ship isn't going to be fixable, but one of the scenarios mentioned above that we have all encountered will definitely improve.

Lens+ is brand new.  Instead of using a series of downloaded lens "profiles", which we know can work very well when the profile is available for your exact lens and camera combination, Lens+ uses raw pixel math to compute for distortions and more importantly chromatic aberrations and makes corrections therein.  It is stunningly good, but be patient, because again, there is a lot of CPU being consumed in the calculation.  In addition to the optical aberration correction, there are both a sharpening and denoising engine included in the package, so you are getting a lot of value for your investment.

As you would want, Piccure+ works not just as a standalone application, but as a plugin to Photoshop, Lightroom and Photoshop Elements.

Piccure+ wants to see the information in the RAW file, so while you can send it other formats, it will ask for the location of the original RAW file to get the real RAW data stream ahead of the Lightroom or Photoshop RAW decoder if it cannot detect the path to the original.  I only know this because on one RAW file in Lightroom, Piccure+ wanted me to point to the original RAW.  The dialogs confused me until I figured out what it wanted and in fairness, it has never happened again since.

What makes Piccure+ different from other plugins is the value proposition.  Most other plugins modify the image by altering colour, contrast, tone, dynamic range, texture, border, filtration - all things that modify the original image.  Piccure+ is not one of those types of plugins.  We love them, but there is good reason to add Piccure+ to your stable of tools and to alter your workflow to include it.

Piccure+ is an optical correction tool.  That's it, that's all.  It doesn't create apparent sharpness by manipulating contrast, it doesn't try to fix aberration by filtering for certain colours or applying a canned profile.  It does real math with your original images as they come out of camera to make them sharper, cleaner and more distortion free.

Here are a couple of sample screenshots to get a sense of how Piccure+ does what it does.  The Goshawk photo on the right is out of camera, imported as CR2 Canon RAW native into Lightroom.    Camera was a Canon 1D Mk IV with Canon's 70-200/2.8L II IS lens.  Exposure was 1/800 at f:/6.3 and ISO 100.   Nothing was done to the image.  On the left is the same photo after a round trip to Piccure+

goshawk piccureplus

To give a better perspective, I have used Lightroom's screen zoom tool to zoom in on feather detail, and then with the Compare screen up, grabbed this second screenshot.  Again, the only processing is the photo on the left after a roundtrip through Piccure+.  The original image is great, right until you look at how much more Piccure+ gets out of it.

Compare the feather detail, Piccure+ on the left, unmodified on the right

In this next sequence of images, the original shot is made on a 1Dx with Canon's razor sharp 180/3.5L macro lens.  The camera was on my RRS tripod and the lighting was Westcott's Stylus continuous light as part of a macro seminar I was doing for Henry's.  Exposure was 6.0s at f:/32 and ISO 100

Crayons straight out of the camera

Crayons after Piccure+

Now you could rightfully argue that since the originals are RAW that no RAW pre sharpening has been done.  Except that this would not be true because by default Lightroom applies some sharpening automatically to all RAW files.  You can certainly disable that if you wish and use an external RAW pre sharpener like the superb Nik Sharpener Pro with the RAW Pre-Sharpen option.  Even then, you are still going to get a better image after using Piccure+

I particularly like that there is no dynamic range or white balance shift as sometimes occurs with other plugins.

Intelligent Imaging Solutions is a small company, dedicated to producing very practical and useful tools.  Until recently, their website was very basic.  They do next to no marketing.  They just build very good, very effective, imaging software.   At $149 Canadian through the web site, Piccure+ may be the most important plugin you can buy, that no one knows you are using.  It really does help you get more out of the camera and lenses you already own.  Everyone recognizes images that have been run through Photomatix or HDR Efex Pro, or Silver Efex or Perfect Portrait.  They all do a great job but you know by looking (probably) that they were involved.  When you use Piccure+, you aren't adding a vendor "look" to your photos, you are making your own photos better by correcting for the natural flaws that occur in lenses and when we capture images.

There isn't a serious photographer out there, who cannot benefit from Piccure+

Flex : Long Exposures in Wooden Buildings

Last weekend, I ventured to Sainte Marie Among the Hurons with my friend Bryan Weiss and some of his Daytripper Photo customers.  The re-creation of the habitat of the Hurons and Jesuits is very well done, and the facility is perfect for photography, so long as one is prepared with a tripod and willing to go with longer exposures.  But I did discover a problem...Before I get to that, do note that this is a re-creation of the 1650s, so there is wood smoke everywhere.  And it is smoke from sapwoods so be sure to clean the outside of your camera when you are done there and even if you are one of those who eschews the use of UV protective filters, this would be a good place to use one. I shot the entire day using a Canon 1Dx with Tamron's new PZD version of the 28-300/3.5-6.3  This is a very impressive lens, nearly as colour rich as Canon's own, at one third the price and one quarter the weight.  A really superb lens.

Wood frame buildings, particularly those framed with a built with Canadian softwoods have a certain amount of flex natively.  In normal situations, if you are the photographer standing still during your long exposures, things will go very well.  If however, you are where there are other tourists, particularly small children who bore easily, be prepared to over shoot because the clomping of feet on floorboards, stairways, second floors and basically anything attached to where you are photographing is going to cause blur.  I found that most all of my indoor photographs where other people were in the building exhibited some amount of blur.

There are solutions that work some of the time, such as Piccure that I have written about in the past as well as Photoshop's own Camera Shake correction.  I say some of the time because although they work wonderfully in most cases, some of my images are beyond recovery.  As it happens, I was gifted with the private beta to a forthcoming offering this morning and it did a better job on addressing the movement, but I cannot talk about it until it is released.

This is just a sample image that has been corrected for the floor shake.  It is not optimal but gives an indication of the possible with the right tools.  The better way would have been to pay more attention to my environment and wait for quiet.

The Father's Desk - after correcting for shake caused by moving floorboards

Solving Microshake blurring with Piccure

How many times have you made a shot, checked the LCD on the back of the camera, and thought you had "it"?  Then you get home, upload the RAW files from the card to the computer, pop the image open in your editor and WAAAH! it's not tack sharp.  Oh it's there and it's not bad, but you can see the subtle blurring that comes from microshake.  Well now you can fix this with a plugin called Piccure. I first looked at Piccure in the fall of 2013 and my first experiment went badly because I didn't follow the instructions.  The manufacturer's representative, a real class guy called Lui, wrote me to point this out and when I used the software as documented it was very good, certainly comparable and in some cases superior to Photoshop's own shake reduction.  But I was critical of the plugin because I don't use JPEGs much at all (ok nearly never) and at that time Piccure required the sRGB colour space.  They listened and a new update just came out that brings support for multiple colour spaces including my preferred ProPhoto RGB.

If you have used shake reduction before, you may not have experienced that at high resolution and in high gamut colour spaces that the math involved is very intensive.  Quick it is not.  There are also posts suggesting that you can cure microshake with aggressive sharpening.  Perhaps, but not well.

With Piccure, you open your image in Lightroom or Photoshop and then use the plugin.  This opens the original as a copy and starts the inspection and rebuild process.  Remember that I said to be patient.  The math involved is very demanding and depending on your CPU it can take some time.  In the end, the result is most often worth it.

Piccure is designed to resolve microshake.  That said, you as the user have a great deal of latitude as to how much shake correction to apply.  It is very much a one by one experiment with no one size fits all answer.  I have inserted two images in this article, the first a 7 step HDR where the camera was mounted on a Manfrotto magic arm for a macro shot.  There was microshake involved purely from vibration in the room, given the less than optimal mounting platform.  The second is the same image adjusted in Piccure at one step more aggressive correction than the micro setting.  I used this explicitly to give readers a sense of the power in Piccure.  More aggressive settings on images that are already very sharp, can produce a crunchy effect similar to an aggressive high-pass sharpening, but without the glopping effect and haloing that aggressive sharpening delivers.

OM-D E-M1 7 Step 32 Bit HDR


Looking closely, you can see the effect of the micro shaking.  The image is just a bit soft.  At this point no adjustments have been made at all, this is the TIFF output from HDRsoft's 32 Bit HDR processing only.  As there were no lens corrections in Lightroom for the camera - lens combination, no corrections were provided prior to the application of the HDR process.  Ghost elimination was turned on in the software.

OM-D E-M1 7 Step 32 Bit HDR after Piccure processing


Even in these 72dpi JPEG exports from Lightroom, the quality improvement is significantly visible.  This was as noted using the shake correction at one level up from Micro, probably more than I would normally use.  I chose this setting to give you a better sense of why Piccure is nothing like trying to fix shake with sharpening algorithms.  There is a dimensionality and texture restored that is what the dying rose looked like under the lights.  You can also see none of the contrast overload or halo effect found with heavy sharpening, or high pass filter based enhancements.

One reader asked why I would suggest buying a plugin when Photoshop CC can be had on subscription so low priced and incorporates camera shake correction.  It's a fair question, and I would say for the same reason one buys any other plugin.  It's probable that the work of any plugin can be done in Photoshop, with sufficient time, expertise and practice.  A great plugin can accelerate the achievement of the artistic goal, giving you the artist more time behind the lens.

I have come around completely on Piccure.  Being able to send it images in ProPhoto RGB colour space right from RAW or a very big TIFF resolves my single major stop gate.  My take is that if you want the best images you can get, without the softening of microshake (long lens bird photographers, this may be you!) Piccure is a fast and cost effective solution.  It is designed to do one thing, and does it extraordinarily well.

The folks at Piccure have been really professional to work with and have welcomed me into their beta program.  I hear great things are coming in Version 2 and look forward to sharing that information with The Photo Video Guy readers when I can.

The folks at Piccure have offered a special deal where The Photo Video Guy subscribers can get a discount on the plugin by purchasing through our link and using coupon code photovideo2014.  Click the logo below to buy your own license.

My Top 12 Holiday Gifts Under $250 (mostly)

Every holiday season the family and friends of photographers go seeking gift ideas.  Every year they ask the photographer or videographer what he or she would like.  Every year the answer starts with a 400/2.8 at eleven grand and the buyer gives up.  The Photo Video Guy is here to help with my top 12 gifts under $250 (mostly). If you buy from B&H, OnOne or Amazon through my links, you help support The Photo Video Guy. If you buy from Adobe or Google, you're getting the deal and if you buy through the Henry's links, well you help them out because Henry's doesn't have an affiliate program. Adobe Creative Cloud Photographer's Bundle

At $9.99 per month if you sign up before December 31st, this is a killer deal.  You get Lightroom 5.x and Photoshop CC for less than the retail price for Lightroom.  Yes it is subscription and yes there is a web activation component, but you get the newest hottest code and the ability to run on two machines simultaneously.  Adobe has listened and this is a great deal.

Adobe Photographer's Bundle

Set of Extension Tubes

It's hard to beat a great macro lens for closeups but this is the entry way to do it.  Using a set of extension tubes enables pretty much any lens to do close up work.  If your gift receiver already has a macro lens, this kit makes it capable of even greater closeup work.  I recommend the set because the kit of three costs about the same as one tube from a manufacturer and works just as well.

Aputure Tubes Canon and Nikon - Henry's Canada Tube Set for Canon Tube Set for Nikon

Kenko Tubes - B&H USA

Tube Set for Canon Tube Set for Nikon

Google Nik Collection

When Google bought Nik, post-processors were terrified.  The Nik Collection used to be $600.  Now it's $149 and contains amazing post processing plugins that work with Lightroom, Photoshop and Aperture including Color Efex Pro, HDR Efex Pro 2, Silver Efex Pro, Sharpener Pro and Dfine Noise Reduction.

Nik Collection

Lastolite Ezybox Hotshoe / Ezybox

Nothing makes a hotshoe flash look better than getting it off the camera and softening the light.  The Lastolite Ezybox hotshoe straps right onto the head of your hotshoe flash and produces really nice light.  If you have an off camera cable or wireless system, you can control your flash centrally and just hold it at arm's length for significantly better flash shots.  Want a bigger source?  Go for the Lastolite Ezybox Softbox.  It includes the bracket and flash mount, all you need is a simple light stand and tilter bracket.  Nothing sets up faster than an Ezybox and the dual diffusion panels make the light beautiful

Henry's Canada - Softbox

B&H USA - Softbox

Henry's Canada - Ezybox Speedlite Kit

B&H USA - Ezybox Speedlite Kit

Cowboy Studios Shoulder Rig for DSLR Video

You could spend a fortune on a shoulder rig to shoot live video with your DSLR or Compact System Camera.  You don't have to.  The Cowboy Studios kit is an amazing value and it just works.  Designed specifically for DSLR and mirror less style cameras, you forego weight and cumbersome rods for a solution that is simple, lightweight and incredibly effective. Also includes a follow focus for less than the price of a standalone follow focus.

Shoulder Rig w Follow Focus

Polarizing Filter

You can do most anything in post processing with digital filters except for true polarization.  Every photographer and videographer will benefit from a polarizer to manage reflections and deepen blue skies on clear days.  Buy the one to fit the largest diameter required and step down rings to use the same filter on lenses with smaller filter sizes. I personally prefer the B+W and Heliopan brands.

Various sizes and prices, check out Henry's

Piccure

I see too many potentially great shots where a bit of camera shake creates enough micro blur to make the shot less than ideal.  Piccure is a plugin that does one thing really well and that is to correct for camera micro shake.  The plugin works with Lightroom or Photoshop.  If your photo enthusiast is complaining about micro blur, this could be the answer.

Get Piccure

OnOne Software Perfect Photo Suite

Full disclosure, I am an affiliate with the great people at OnOne Software, and if you buy the software through my link I earn a minor commission.  That said, Perfect Photo Suite 8 rocks.  The Suite contains Perfect Effects, Perfect Enhance, Perfect Portrait, Perfect Resize, Perfect B&W, Perfect Browse, Perfect Layers and Perfect Mask.  And the full suite is on sale right now.

Cowboy Studio Continuous Lighting Kit

This is a very inexpensive multi-head continuous lighting kit that is perfect for someone starting out.  You get in a easy to handle kit, two light stands, one boom stand kit with bracket, a lamp housing with soft box for the boom, two 5 lamp housings with two 20"x28" soft boxes, 10 45w bulbs, 1 65w bulb and a carrying case.  Because it is continuous lighting based on CFL bulbs it's perfect for photography and videography and the lights run cool so you don't bake your talent.

Manfrotto Boom/Stand Kit

Every photographer needs a light stand.  They also need a boom.  They usually find out that they need a boom after buying a light stand.  Then another trip to the store to buy a sandbag to keep everything from being tippy.  Save time and money with the superb Manfrotto 420B Combi-Boom Stand.  It folds compactly and is all most folks will ever need in a complete kit with a boom that doesn't creep like some sold for more money.

Henry's Canada - Manfrotto 420B

B&H USA - Manfrotto 420B

External Hard Drive

Photos and videos take up space.  Many photographers and videographers have limited space on their preferred laptops so an external drive is the way to go to hold libraries and projects.  You can build your own using components or buy complete units.  The WD Passports are complete kits that work pretty well as are the G-Tech series.  I've had bad experience with LaCie myself but many people love them.  My greatest success comes from buying a case and putting an SSD into it.  Screaming fast and easy on energy.

WD 2TB USB3

Aputure HDMI Monitor

That little LCD on the back of the camera just isn't big enough to confirm sharpness and a good shot, especially with video.  Every videographer needs an external monitor that runs off the HDMI port to check their recordings.  The videographer is often in the "shot" and an external display can be positioned to help the talent see what's going on.  The Aputure 7" display does a great job at a really low price.

Henry's Canada - Aputure HDMI Monitor

Episode 81 - The Photo Video Guy Podcast

Piccure - micro camera shake correction.  Nikon D5300 has focus issues with some Sigma lenses, fix maybe.  Nikon Df shipping.  Nikon stock poor performer in 2013.  Nikon to release Nikon 1 V3 in January.  Google RAW coming to Android.  Fujifilm announces digital magazine for X Series owners, updates X series firmware again.  Canon C300 gets new firmware and wins Asia Silver Award.  Canon to release new non-L primes in 2014 with IS.  Adobe deal on PS/LR for $9.99 / mth ends Dec 2nd.  Leica prices go up Jan 1, 2014.  Leica takes over Sinar.  Leica M240 deisgned by Jony Ive and Mark Newsome sells for $1.8M at auction.  Olympus releases new firmware for the OM-D E-M1.  Roger Cicala writes the Devil's Photography Dictionary.

A Second Look at Piccure

I am always interested in hearing alternate perspectives.  Recently I wrote a review of a plug-in called Piccure and indicated that it wasn't right for me.  Lui from Intelligent Imaging Solutions GmbH wrote with some suggestions on how I might improve my results.

His first suggestion was to read through the Handbook that they make available.  I had scanned it, and did not read it word for word.  I read it and there is a recommended workflow that I did not follow.

Lui suggested that Piccure be the first thing I do, before any other editing, stating that other filters are destructive.  While Lightroom is non-destructive by design, a saved file like a TIFF as used by any plug-in has had filtration applied if editing has been done.  Ok, while this is completely contrary to my normal workflow, just like Nik's Pre-Sharpening, I will do start with Piccure before doing ANYTHING else.

The Handbook says Edit in Piccure using TIFF, 16 bit and sRGB.  I would never have tried this as I prefer the proper and full colour gamut of ProPhoto RGB.  Lui honestly states that in the current release Piccure doesn't work very well with ProPhoto RGB or Full RGB.  It works best with sRGB.  This is sub-optimal in my view but in respect of his courtesy to write, I agreed to give it a shot.

He also suggested using a Smartspot.  I had tried this but didn't see a difference, but again, I will do so.  He also coached that the Micro setting is a better place to start than the default of Medium because the design precepts behind Piccure are solely to the micro evidence of camera shake.  Here's a comparison screen grab with Piccure on the left and the original RAW on the right.

Compare_Piccure-3

So here's what I learned from following the Handbook and the guidance from Lui.

The sRGB choice, while I don't like it, makes a significant difference in Piccure's success.  No longer are the colours skewed and the image is no longer made crunchy and as noisy.

Cautious placement of the Smartspot helps a lot.  I tried placing the Smartspot where recommended and then also in a number of other places.  This is time consuming because of the processing load to recalculate with each placement, but it definitely makes a difference in Piccure's success.

Lui also suggested manually tweaking the defaults.  I had already done this in my first review, and so I agree that this is always a good idea.

Edited first in Piccure as TIFF, sRGB, 16 bit, then further adjustments in LR 5.2

Outcome

Ok I stand corrected.  Piccure does a VERY GOOD job when you follow the instructions.  If I did not already have a subscription to Creative Cloud (I do) and micro camera shake was something I was concerned about (it is - I shoot sports and wildlife with long lenses), Piccure is a very good solution.   At $80 it may be all you need.

What I Liked

It's a very focused offering.  I can alter my workflow to put Piccure first when I use it.  I'm still not completely clear about adjusting colour balance before or after using Piccure, although I believe that so long as I know the colour temperature, it shouldn't make a big difference if I fix the WB after using Piccure.  The number of variables are small and while the processing requirements are significant when set to highest quality, you get good and visible results.  It does not correct out of focus shots, it corrects for camera micro shake - just as promised.  In my test images the amount of shake was very small but Piccure did the corrections and so long as I followed the Handbook, I got consistently good results.

What I Would Like to See Improved

Number one for me would be to not have to drop the gamut to sRGB when going to Piccure.  I'd much rather be able to have Piccure work properly with ProPhotoRGB gamuts.  I am guessing that the architects understood that sports shooters might be candidate customers and pro shooters tend to shoot in JPEG regardless because they need to upload to their services on the breaks and a decent JPEG is fine for wire services and web broadcast.  That would be a reasonable business decision but it's not me.  I never shoot in JPEG unless I have screwed up.

In the end, I have Photoshop CC and Adobe's Camera Shake Reduction algorithm is very good and there are no restrictions on colour spaces when using it.  If I did not have Photoshop CC, I'd be buying the Piccure plugin because it works, and because Lui advised that addressing the colour space limitation is on their roadmap.  A big thank you to Lui and the rest of the team at Intelligent Imaging Solutions GmbH for building a good tool, and more importantly for caring what prospective customers think and for making a real effort at creating customer joy.  Other software companies could learn from this attitude.

Is Piccure Your Next Plugin Purchase?

I was listening to a recent This Week in Photo episode #TWIP and heard about this plugin called Piccure.  It was described as a tool to help correct camera shake.  There's a 14 day free trial so I thought I would download it and give it a shot. NOTE :  Since this initial review, I received some guidance from the manufacturer directly and applied it.  I got better results.  After reading this post, head on over to http://thephotovideoguy.ca/?p=1487 for the follow-on

Most folks know that Photoshop CC has a camera shake correction and it's quite good.  Not everyone has Photoshop CC and sometimes a dedicated plugin can be the answer, particularly for people who do all their work in Lightroom.  Piccure comes as a plugin for both Lightroom and Photoshop.  At time of writing there was no support for Aperture.

Initially I feared that the tool would simply do some fairly aggressive sharpening, using a high pass filter style algorithm and punch the contrast up to make it look like it was correcting for camera shake.  So for my tests, I used images that were already corrected in these ways and where extra sharpening and contrast would really make the shot look crispy.

I've netted this down to a single image for the sample pics in the article to make it clearer what is happening.  Please know that I am not making my valuation based solely on a single image test.  What is shown here is consistent with what I saw on all tests.

Piccure really does seem to do some significant math to determine where movement has taken place in the frame.  The default settings of Medium for shake and middle ground for sharpening produced really horrible results with the test image.  They were already pretty sharp.  It's definitely doing something.  I got a warning that because the image was large, it could take a while.  While processing, all eight cores in the Mac Pro were quite busy.

For point of interest, the test shot shown has the following EXIF.

  • Canon 1D Mark IV
  • Canon 70-200/2.8L IS II
  • 175mm, IS mode 2
  • 1/400
  • f/2.8
  • ISO 2500
  • EV +1 2/3
  • Shot handheld, unsupported

When you launch Piccure from Lightroom, you do so as with most all other plugins.  Right click, choose Edit In and select Piccure.  The defaults are sRGB and 240 dpi.  I reset those to ProPhoto RGB and 300 dpi as those are my common defaults.  The Piccure window looks like this;

PIccure_Process


You can see that it gives you a look at what it's going to do, a processing indicator and three sliders.  The first controls the balance of speed of work vs quality.  Default is full quality.  Second defines the amount of camera shake to correct for.  Default is medium.  Since there was near negligible camera shake, the results were ghastly.  I've moved it all the way to micro correction.  The third slider is called Sharpness varying between Smooth and Sharp.  In every experiment I end up with this all the way over to Smooth to prevent edges you could cut yourself on, along with a lot of duplication.

In the second image, I've zoomed in to 1:1 and you can see the Piccure proposed fixes on the right side.  The Canadian flag is nearly unrecognizable the goaltender's face cage is blown out and has black halos.

Piccure_2-2

It's pretty brutal so I backed off the Sharpening completely.  In the next two images, I've shifted the display to show first the goaltender's face "corrected".  Look at how shattered the OJHL logo becomes in the processed side.  Then I shifted the image to show the goaltender's face without the processing.  The difference, even with the sliders for shake and sharpness backed full off is substantial.  I admit I don't like what I am seeing.

Piccure_3-2


Piccure_4-2


I didn't give up at this point, but let Piccure do its thing.  To my disappointment, the image is very edgy, the colour saturation is compressed, the contrast is way up and adjustments made in Lightroom have been crushed.  You can see this in the next sequence.  The first image is the export direct from Lightroom without using the Piccure plugin at all.  The second is what came back to Lightroom directly from Piccure and the third is after re-adjusting the Piccure image.

LR Adjustments Only

Piccure No Correction

Piccure Adjusted

I'm sorry to say that even while the Piccure plugin has done some camera shake adjustment, I feel like I've lost more than I've gained.

By now, you've figured out that I'm not really blown away by the plugin.  You're right.  For $80, I'd like less crispy and less overall image loss.  I need to be fair, there was very minimal camera shake involved in the original image, but these are the ones I would want to tighten up.  If the shot is blur city, it goes to the trash.

As a final point of comparison, here's the LR edit passed through Photoshop CC invoking the Camera Shake Reduction filter and returned to Lightroom before export.  Consider that Adobe now has Lightroom and Photoshop CC for $10 a month.  You can have both programs for half again what the plugin costs on its own.  I hope the folks who make Piccure continue to enhance their product.  I won't be buying a license at this stage.  I can get better results using the tools that I have.  Fortunately software is an evolutionary business and they can continue to improve.  And perhaps Piccure is exactly the right thing for people who may not care to spend as much time in post-processing as I do, or who have more shake evident in their images.

Photoshop CC Shake Reduction Filter Applied